
ZTM Integration Guide
Intro
Spidr's Zero Touch Monitoring (ZTM) provides real-time fraud detection and compliance checks across your embedded finance operations. This guide covers how to integrate ZTM into your application, from SDK setup through transaction monitoring.
How ZTM Works
Architecture Overview
ZTM checks always require the following:
- Create a session and initialize the Sardine SDK (or use an existing session if applicable). Spidr recommends setting a session expiration of no more than 30 minutes.
- Pass the sessionKey and
falseforbypassZtmin your request to Spidr's Unified API endpoint.
Step 1: Generate or Use an Existing sessionKey
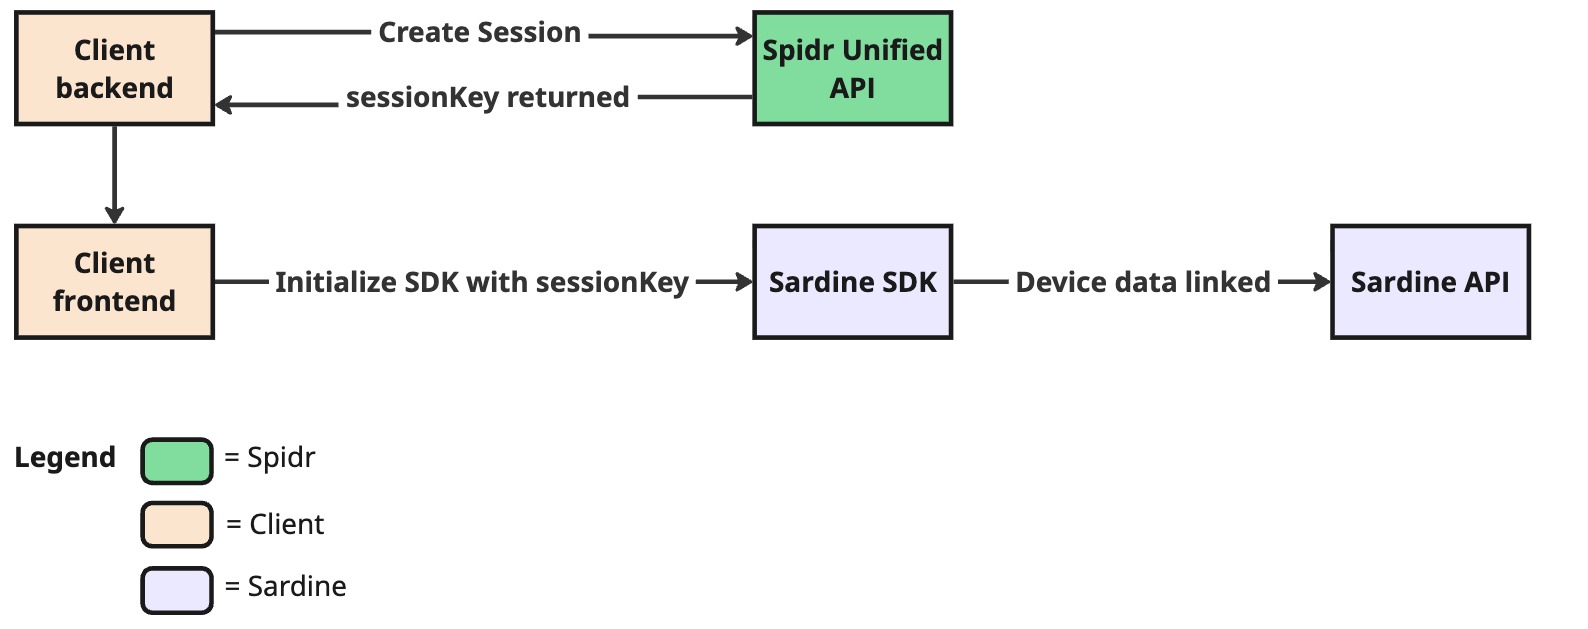
Generate or use existing sessionKey
Your backend calls POST /ztm/v1/session/create to obtain a sessionKey. Pass this key to your frontend, which initializes the Sardine SDK. The SDK immediately begins collecting device fingerprint and behavioral biometrics data, linking it to the session in Sardine's cloud. This data collection should start as early as possible -- ideally before the user begins filling out any forms -- to capture the richest behavioral signals.
Tip: You can reuse a
sessionKeyacross multiple API calls. Create a new session when the previous session has aged out (we recommend a 30-minute expiry enforced on your end).
Step 2: Call Unified API / ZTM
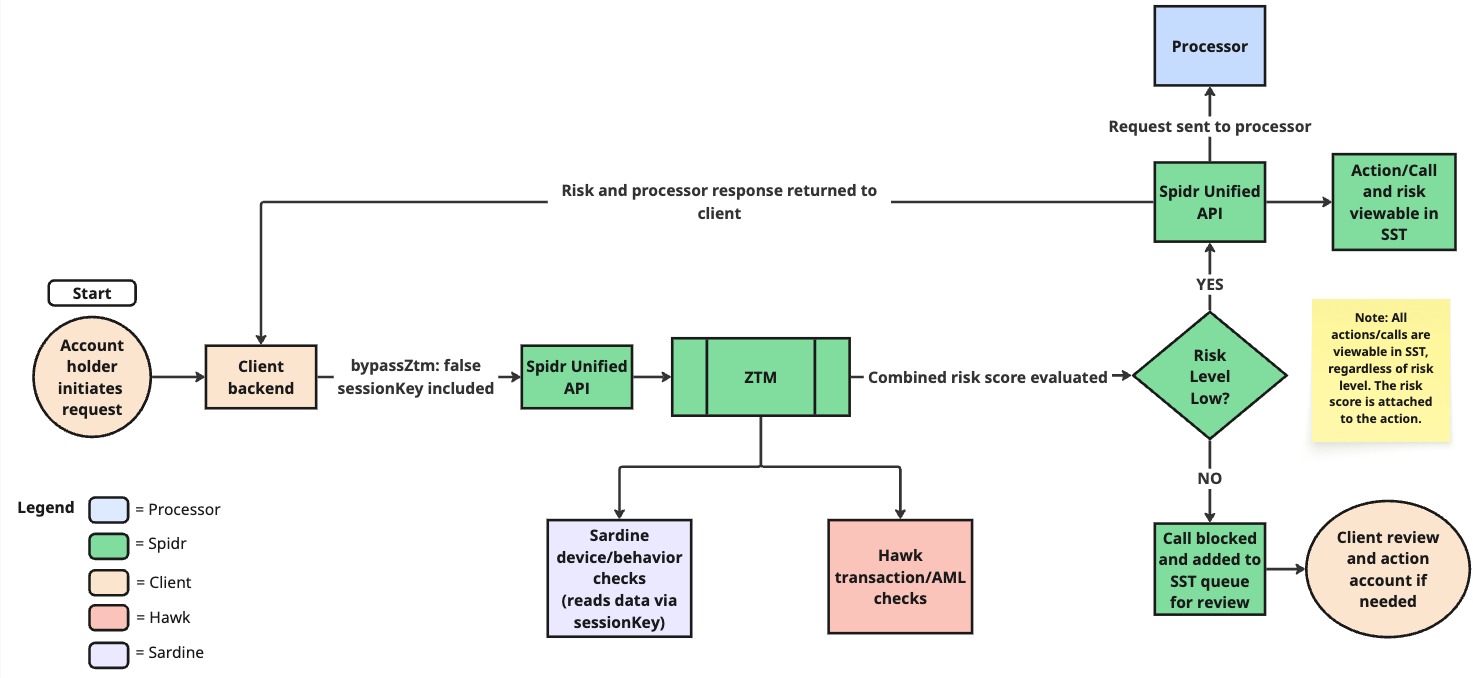
Call Unified/ZTM
When your backend makes a Unified API call with bypassZtm: false and the sessionKey, ZTM checks are ran against the data provided in the call. Spidr's workflow engine reaches out to configured providers in parallel -- Sardine reads the device/behavior data collected via the session, and Hawk runs transaction and AML checks (if applicable). The combined risk score is evaluated:
- Low risk -- The request proceeds to the processor, and the action (with its risk score) is viewable in SST.
- Medium / High risk -- The call is blocked before reaching the processor. The action is added to the SST queue for your Fraud & Compliance team to review and decision.
Note: All actions are viewable in SST regardless of risk level. The risk score is always attached to the action.
Key concepts:
- Session: A short-lived token linking device intelligence data (collected by the Sardine SDK) to backend API calls. Created via the ZTM API, passed to both the Sardine SDK and included with your Unified API requests.
- Action: Every operation that runs through ZTM creates a
SpidrActionrecord tracking the risk assessment, decision, and audit trail. Actions are routed to specific queues in SST for review by your Fraud & Compliance team. bypassZtm: A boolean flag on Unified API requests. Set tofalseto run ZTM checks; defaults totrue(no checks).- Risk Levels:
low,medium,high,pending-- determined by aggregating scores from configured providers (Sardine, Hawk, Plaid). Risk thresholds and rules can be configured with Spidr. - Decision: The overall outcome for an action --
approvedordeclined. Decisions can be posted manually via the API or through SST. Approving an action lets it proceed to completion; declining blocks it. - Feedback: After a decision is made, you can submit feedback (
agreeordisagree) to help train the ZTM model and its underlying providers, improving future risk assessments.
Request Flow (Step by Step)
- Create a ZTM session --
POST /ztm/v1/session/create - Initialize the Sardine SDK on the client with the
sessionKey - Make your Unified API call (e.g., Create User) with
bypassZtm: falseand thesessionKey - Spidr's workflow engine calls configured providers (Sardine, Hawk, Plaid) in parallel
- Provider scores are aggregated into a single risk level
- The action is created with a risk level and routed for decisioning (per your program configuration)
- The response includes
spidrActionIdand ZTM data; a webhook with risk data is also sent to your endpoint
Sardine SDK Integration
If your program is utilizing Sardine for device and behavior checks, you'll need to install and configure the Sardine SDK. The SDK collects device intelligence (fingerprinting, behavioral biometrics) from the user's browser or mobile device. This data is linked to your backend API calls via the sessionKey.
Prerequisites: Access to the Sardine dashboard and Sardine docs. Check with a Spidr team member if you need access.
For the full Sardine SDK guide, see: https://docs.sardine.ai/guides/integration/risksdk/overview
What Spidr Provides
1. .npmrc File
.npmrc FileSpidr will provide a pre-configured .npmrc file containing the authentication and private registry access required to install the Sardine SDK packages.
- Place the
.npmrcfile in your project root (same directory aspackage.json) - Run your package install command (
npm install/yarn install/pnpm install)
Do not commit the
.npmrcto version control -- it contains authentication tokens. Add it to your.gitignore.
2. Sardine Client IDs
Spidr will provide separate clientId values for each environment:
| Environment | Purpose |
|---|---|
| CV (Certification/Validation) | Testing and certification |
| Production | Live environment |
Platform-Specific Setup
Both the web and React Native SDK packages are private. You must have the .npmrc (provided by Spidr) in your project root before running the install steps in the Sardine docs.
| Platform | Sardine Docs |
|---|---|
| Overview | https://docs.sardine.ai/guides/integration/risksdk/overview |
| Web (Next.js) | https://docs.sardine.ai/guides/integration/risksdk/websdks/nextjs |
| Mobile (React Native) | https://docs.sardine.ai/guides/integration/risksdk/mobilesdks/reactnative |
SDK Usage
Once the SDK is installed, you'll use it for three things:
- Initialize the SDK with the
sessionKeyreturned fromPOST /ztm/v1/session/create. This ties the user's device to the session and allows device/behavior data to be associated with it. - Update Sardine context on login -- upon user login, update the Sardine context with the user's Spidr
userId. - Ad hoc checks -- if you are performing an ad hoc check via
POST /ztm/v1/user/other, update the SDK with theflowNameyou are passing in.
Flow Types
When initializing or updating the SDK, you specify a flow type to tell Sardine what kind of activity the user is performing. Spidr handles the passing the appropriate flow for Unified API calls. However, you can pass in a custom flow when risk checking non-Unified actions. Some examples are listed below:
| Flow | When to Use |
|---|---|
login | Returning user authentication |
password_reset | Password reset flows |
update_preferences | Profile or app preferences |
Best Practice: Initialize the SDK as early as possible in the user flow so it can collect behavioral data (typing patterns, mouse movements) before the user submits a form. Create the session and update the Sardine config before showing the form.
Session Expiry: Spidr does not enforce session expiration server-side. We recommend enforcing a 30-minute expiry on your end.
Quick Setup Checklist
- Receive
.npmrcand Client IDs (CV + Production) from Spidr - Place
.npmrcin project root (add to.gitignore) - Install the appropriate SDK package for your platform (see Sardine docs above)
- Set
clientIdin your environment config - Initialize SDK with session key from
POST /ztm/v1/session/create - Update Sardine context with Spidr
userIdon login - Test onboarding flow in CV environment
Use Case Walkthroughs
Each use case below describes the API flow, the relevant ZTM action type, and what to look for when verifying the integration. For full request/response schemas, see the API Reference.
Please note that the examples below are not all-inclusive. For a full list of endpoints that support ZTM checks, please see Endpoints Supporting ZTM.
User Onboarding (KYC)
This is the foundational flow -- most other operations require a user to exist first.
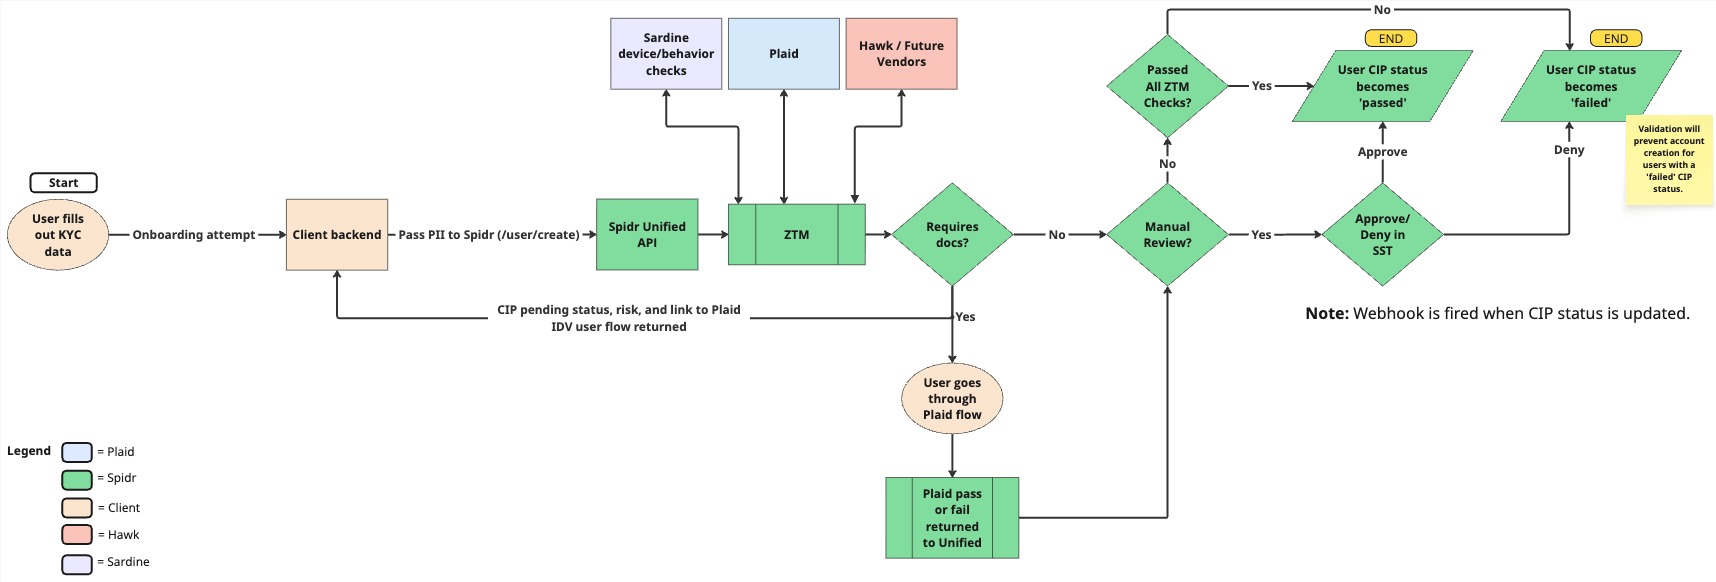
IDV/Onboarding through ZTM
The diagram above shows the full onboarding flow including ZTM risk checks, Plaid IDV (if configured), manual review paths, and CIP status outcomes. A failed CIP status will prevent account creation for that user.
Flow: Session Create -> SDK Init -> Create User (with ZTM checks) -> Decision
Steps:
-
Create a ZTM session via
POST /ztm/v1/session/create. PassuserIdif the user already exists; omit it for new users. As soon as you receive auserIdfrom Spidr, update the Sardine context with the ID. -
Initialize the Sardine SDK with the returned
sessionKey. -
Create the user via
POST /v1/user/createwith:bypassZtm: falsesessionKey(from step 1)- User PII (name, DOB, email, phone, SSN, address)
initialProductId(your product ID)idvTemplateId(if using Plaid IDV)
-
Handle the response:
userId-- the Spidr user ID (store this)spidrActionId-- ZTM action ID for trackingztmData-- risk level and provider details- If Plaid IDV is configured, the response may include a
shareableUrlfor the user to complete identity verification
What happens behind the scenes:
- Sardine runs customer + device checkpoints using SDK-collected data
- If Plaid IDV is configured, an IDV session is created
- If watchlist screening is configured, AML checks run
- Provider scores are aggregated into a risk level
After onboarding, create an account via POST /v1/account/create with the userId and productId. Note that a Spidr account can only be created for users with a CIP status of pass.
You will receive a webhook when a user's CIP status has been updated, see user.cipStatusUpdate. You can use this event to trigger onboarding rejection/acceptance logic in your app.
ZTM Action Type:
user_create
Completing Plaid IDV in CV
Plaid recognizes a single fixed test identity, Leslie Knope. Submit these exact values to pass Plaid IDV checks:
| Field | Value |
|---|---|
| First name | Leslie |
| Last name | Knope |
| Mobile number | +1 234-567-8909 |
| Verification code (OTP) | 11111 |
| Address | 123 Main St. |
| City | Pawnee |
| State | Indiana |
| ZIP | 46001 |
| Date of birth | January 18, 1975 |
| SSN | 123-45-6788 (or 123-45-6789) |
How checks resolve in CV:
- Data Source check: compared against the values above; an exact match passes.
- Document check: uploaded documents are always treated as genuine. It passes only if the name and date of birth match Leslie Knope, and fails otherwise.
- Selfie check: does not run in Sandbox, even if enabled on your template.
To test failures: submit a wrong address, SSN, or phone to fail the Data Source check; submit a wrong name or date of birth to fail the Document check.
Onboarding Decisioning & Manual Review
When a user is created with ZTM checks, two independent settings on your product configuration determine what happens after the providers return their results:
-
Auto-decisioning -- your product defines which risk levels are auto-approved for each action type (auto-approve low risk, for example). If the aggregated risk level lands in the auto-approve list, the action is approved automatically and the user's CIP status moves to
pass. Any other risk level stages the action for a decision: it appears in the SST IDV & Monitoring queue (and fires the idvSession.needsDecision webhook) for your team to approve or decline. -
Manual review -- a flag layered on top of the auto-decisioning logic, configured on your product. Instead of routing the completed Plaid IDV session straight to decisioning, it first requires a human review step in SST. It can be configured to trigger on all sessions, on failed sessions only, or never.
How manual review works:
- While a session is awaiting manual review, the IDV provider's risk level stays
pending, so no decision (auto or staged) is made yet. You'll receive the idvSession.manualReviewRequired webhook. - A reviewer opens the session in SST and tags it low risk (pass) or high risk (fail). See IDV Manual Review and Decisioning in the SST User Guide.
- The tagged risk level then flows through the normal decisioning logic above: the action auto-approves if the aggregated risk level is in your auto-approve list, or stages for a decision otherwise.
Example permutations for a product configured with auto-approve risk level low and manual review on IDV fails only:
| Sardine/Vendor risk | IDV Score | Outcome |
|---|---|---|
| low | pass | Auto-approved -> CIP pass -> user.cipStatusUpdate |
| medium / high | pass | Staged for decision in SST (idvSession.needsDecision) |
| any | fail | Manual review in SST first; the reviewer tags low or high, then decisioning runs on the aggregated risk level |
| any | not completed | Action stays pending until the user completes the Plaid IDV session |
For the manual review row: if the reviewer tags the session low and Sardine also returned low, the action auto-approves; any other combination stages for a decision in SST.
The final CIP outcome -- however it was reached -- is always delivered via user.cipStatusUpdate. Treat that webhook as your single source of truth for the terminal pass/fail.
Note: Both settings are configured per product by Spidr. Reach out to your Spidr team to tune the auto-approve risk levels or the manual review trigger for your program.
Incoming ACHs & Card Authorizations)
Direct deposits, other incoming ACH credits and debits, and card authorizations are processor-initiated -- they are not triggered by your API calls. ZTM monitors these automatically based on your product's workflow configuration.
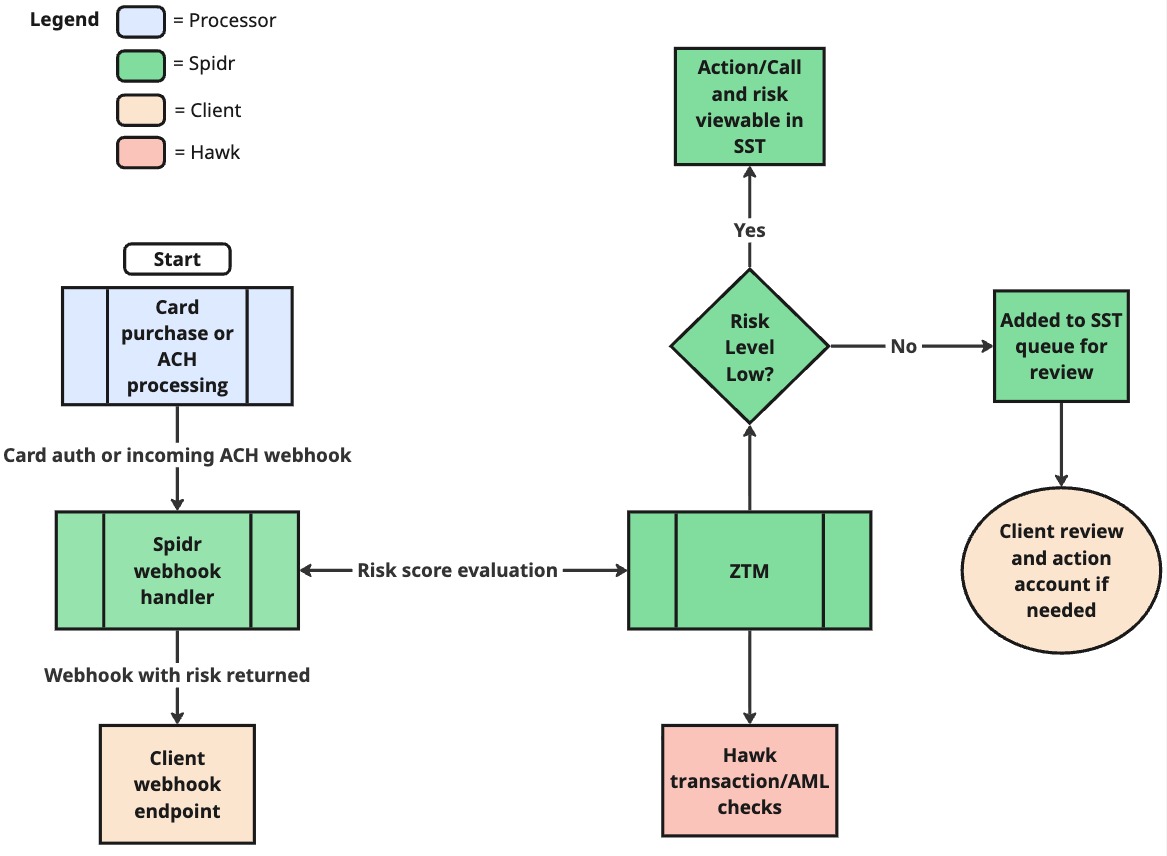
Incoming ACH/Card Auth Checks
When the processor receives a card authorization or incoming ACH transaction, Spidr's webhook handler picks it up and sends it through ZTM for risk evaluation (Hawk transaction/AML checks). The result -- including the risk score -- is attached to the action and delivered to your webhook endpoint. Low-risk transactions proceed normally; non-low-risk transactions are added to the SST queue for review.
Incoming ACH:
- Initiated by a third party (e.g., an employer's payroll system)
- Monitored via the
transaction_ach_incomingaction type - No API call or
bypassZtmparameter needed on your side
Card Authorizations & Settlements:
- Card-not-present (online) and card-present (point-of-sale) purchases
- The card network sends authorization requests to your processor, which Spidr processes
- Monitored via the
transaction_card_authaction type - For BYOP clients, card transactions are instead reported to Spidr via
POST /v1/transaction/createTransactionwithbypassZtm: false(see below)
What to verify:
- The transaction appears in the user's transaction history via
GET /v1/transactions - The
ztmDataon the transaction record shows the risk assessment - Your webhook endpoint receives the transaction event with risk data
For testing card flows in sandbox:
POST /v1/transaction/simulateCardAuth-- Simulate a card authorizationPOST /v1/transaction/simulateCardSettle-- Simulate a card settlement
BYOP (Bring Your Own Processor) clients report card transactions via POST /v1/transaction/createTransaction with:
accountId,cardIdtxnKey-- unique transaction reference from your processortxnType-- e.g.,purchase.authorization,purchase.settlementamount,status,txnDatemerchantdetails (name, MCC, city, state, country)entryMode--card_not_present,chip,swipe,contactless, ormanualbypassZtm: falseto enable ZTM checks
| ZTM Action Type | Trigger |
|---|---|
transaction_ach_incoming | Incoming ACH (processor-initiated) |
transaction_card_auth | Card authorization (processor-initiated) |
transaction_create | Card transaction reported via BYOP endpoint |
ACH Transfers
ACH transfers move money between a user's Spidr account and their linked external bank account.
Flow: Session Create -> SDK Init -> Create ACH Transfer (with ZTM checks)
Steps:
-
Create a ZTM session via
POST /ztm/v1/session/createwith theuserIdor use an existing sessionKey. -
Update the Sardine SDK with the
sessionKey. -
Create the ACH transfer via
POST /v1/transaction/createAchTransferwith:bypassZtm: falsesessionKeyaccountId-- the user's Spidr accountachAccountId-- the linked ACH accountamountdescriptiondebitCreditIndicator--"credit"(push to external bank) or"debit"(pull from external bank)
-
Handle the response:
achRequestId-- ACH request tracking IDspidrActionId-- ZTM action IDztmData-- risk assessment and provider details- Medium/High risk levels are auto-blocked and will not make it to the processor. You will receive a ZTM 'No Go' error if a call is blocked due to ZTM. If the call is deemed low-risk after review, you must resubmit the request with
bypassZtmset totrue.
ACH Credit (outbound push): Money goes from the user's Spidr account to their external bank. ZTM assesses risk of the outbound transfer.
ACH Debit (outbound pull): Money comes from the user's external bank into their Spidr account. ZTM can also trigger a balance check on the linked account via Plaid before processing.
ZTM Action Type:
transaction_ach_create
A2A Transfers
Use the Create A2A Transfer endpoint to move funds between two Spidr accounts.
Flow: Session Create -> SDK Init -> Create A2A Transfer (with ZTM)
Steps:
-
Create a ZTM session via
POST /ztm/v1/session/createwith the sender'suserIdor use an existing sessionKey. -
Update the Sardine SDK with the
sessionKey. -
Create the A2A transfer via
POST /v1/transaction/createA2ATransferwith:bypassZtm: falsesessionKeysenderAccountIdreceiverAccountIdamountdescription
-
Handle the response:
spidrActionId-- ZTM action IDztmData-- risk assessment- Medium/High risk levels are auto-blocked and will not make it to the processor. You will receive a ZTM 'No Go' error if a call is blocked due to ZTM. If the call is deemed low-risk after review, you must resubmit the request with
bypassZtmset totrue.
ZTM evaluates A2A transfers assessing both the sender and receiver in the risk calculation.
ZTM Action Type:
transaction_a2a
Understanding the ztmData Response
ztmData ResponseEvery ZTM-enabled request returns a ztmData object alongside the primary response data. Here's what to pay attention to.
Top-Level Fields
| Field | Description |
|---|---|
riskLevel | The overall aggregated risk level (low, medium, high, pending). This is the primary value your app should use for routing logic. |
providerSummary | Shows which providers ran and each one's individual risk level via providerLevels. Useful when the overall level is elevated and you need to see which provider flagged it. |
providerResponses | Detailed per-provider response data. See below. |
providerErrors | Any errors from providers. Always verify this is empty -- if not, the risk assessment may be incomplete. |
isTrainingMode | When true, risk checks run but actions are not blocked regardless of risk level. |
Sardine Response (in providerResponses)
providerResponses)| Field | Description |
|---|---|
level | Sardine's overall risk level for this action. |
sessionKey | Cross-reference this in the Sardine dashboard to inspect device/behavior data. |
flowName / flowType | Which flow was evaluated (e.g., flow-user-create / onboarding). |
customer.score | Numeric risk score (0--99, lower = less risky). |
customer.level | Risk level derived from the score. |
customer.signals | Individual risk signals (address, email, phone, PEP, sanctions, etc.) -- check these to understand why a score was assigned. |
aml | (Transaction flows only) AML-specific risk level and triggered rules. |
checkpoints | Rule categories evaluated by Sardine (e.g., customer, onboarding, aml). Each has a riskLevel. |
rules | Rules that fired. isLive: true means the rule is enforced; isLive: false means it's in shadow/testing mode and doesn't affect the outcome. |
Hawk Response (in providerResponses)
providerResponses)| Field | Description |
|---|---|
level | Hawk's risk level for this action. |
providerData.caseId | Use this to look up the case in the Hawk dashboard. |
providerData.proceed | true = proceed, false = review/block. |
Decisions, Feedback, and Actions
Understanding Actions
Every interaction with the Spidr platform -- whether initiated by your app or through SST -- is logged as a Spidr Action. When ZTM is enabled (i.e., bypassZtm: false), the action includes risk data from configured providers.
Each action includes:
- Status:
pending,success,blocked,failedsuccess-- processed successfully by Spidr and the underlying processorblocked-- prevented from reaching the processor due to risk levelfailed-- error encountered during processing
- Risk Level:
low,medium,high,pending - Decision:
approvedordeclined(ornullif awaiting decision) - Bypass ZTM: Whether ZTM checks ran on this action
Checking Action Status
Every ZTM-monitored operation returns a spidrActionId. Query the action via:
GET /ztm/v1/action/{spidrActionId}
The response includes status, decision, riskLevel, providerSummary (risk levels per provider), and decisionDetails.
Posting a Decision
Actions with a pending status require a decision. Post a decision via POST /ztm/v1/action/decision with:
id-- thespidrActionIdactionType-- must match the original action type (e.g.,user_create)decision--"approved"or"declined"reason-- text explanation for the decision
Approving an action lets it proceed to completion. Declining an action blocks it from proceeding further. Decisions can also be made through SST by users with the Compliance role.
Some actions may be auto-decisioned per your configuration with Spidr. Auto-decisioned actions receive a decision from ZTM based on the risk level.
Providing Feedback
After a decision has been made on an action (either auto-decisioned or manual decision), you can submit feedback to help train the ZTM model and its underlying providers. Post feedback via POST /ztm/v1/action/feedback with:
feedbackType--"agree"or"disagree"reason-- text explanationfeedbackUpdates-- array of{ spidrActionId }objects (batch feedback supported)
In SST, feedback is submitted through the Feedback Queue under the ZTM section. Only the Compliance role can submit feedback.
Listing Actions
Query actions via GET /ztm/v1/action with query parameters for filtering.
Supported filters: status, decision, riskLevel, userId, accountId, transactionId, bypassZtm, actionType, and more.
Verification and Debugging
When integrating, it's important to confirm that data reaches all layers of the platform. Here's how to trace a request end-to-end:
1. Spidr API Response
Every ZTM-enabled request returns:
spidrActionId-- unique action identifierztmData-- risk level and provider details (when ZTM runs)
Store the spidrActionId for all subsequent lookups.
2. ZTM Action (ZTM API)
Query the action directly via GET /ztm/v1/action/{spidrActionId} and check:
status-- Is itpending,success, orblocked?riskLevel-- What risk level was assigned?providerSummary-- Which providers ran and what did each return?decision/decisionDetails-- Was it decisioned? By whom?bypassZtm-- Confirm it'sfalse(ZTM actually ran)
3. Sardine Dashboard
If Sardine is a configured provider, verify the session in the Sardine Dashboard:
- Log in to your Sardine dashboard (reach out to Spidr if you need access)
- Search by the
sessionKeyused in your request - Verify device intelligence data was collected (device fingerprint, behavioral signals)
- Check the customer risk score and any triggered rules
- Confirm the flow type matches the type of action (
onboarding,transaction, etc.)
4. SST (Spidr Service Tool)
SST is Spidr's admin tool for account maintenance and operational activities. It's powered by the Unified API and provides real-time visibility into ZTM data. See the SST User Guide for full details.
Key SST screens for verification:
-
User Actions / Account Actions tabs -- Every action is logged here. Click "View Details" on any action to see the full Action Details Modal which includes:
- Summary -- Status, risk level, decision, provider summary with per-provider risk breakdown, and decision details
- Provider Details -- Raw data from Sardine, Hawk, etc. Includes a link to jump out to the vendor dashboard
- Change History -- Before/after values for any updates
- Errors -- Any failures at the Unified or ZTM level
-
ZTM Queues (sidebar) -- Specialized queues for reviewing ZTM-scored actions:
| Queue | Purpose |
|---|---|
| IDV & Monitoring | All user_create and watchlist actions for programs enrolled in IDV/watchlist monitoring. Used for manual review and decisioning. |
| Feedback | Actions that have been decisioned but need feedback (agree/disagree). Only visible to Compliance roles. |
-
CIP Tab (User Details) -- If your program uses IDV and/or watchlist screening:
- Shows current CIP Status (
pending,pass,fail) - Shows Watchlist Status and any hits requiring review
- IDV session details and document review
- Shows current CIP Status (
-
Linked Institutions Tab (User Details) -- Review all linked external bank accounts and their underlying institution accounts.
5. Webhooks
Spidr sends webhooks for ZTM events. Verify your webhook endpoint receives the relevant webhooks listed here: ZTM webhooks.
Common Troubleshooting
| Symptom | Likely Cause | Fix |
|---|---|---|
| No ZTM data in response | bypassZtm is true (default) | Set bypassZtm: false in your request |
| Device data missing in Sardine | SDK not initialized with session key | Ensure Sardine SDK is updated with sessionKey before the user submits the form |
| Session key error | Session expired or wrong company | Create a fresh session; ensure your API key matches the environment |
Risk level is pending | Provider returned inconclusive result | Check the Plaid dashboard; may require the user to complete IDV or manual review may be required. |
CIP status is pending | IDV or watchlist review not complete | Complete IDV manual review and/or watchlist hit review in SST. |
Endpoints Supporting ZTM
The following Unified API endpoints accept the bypassZtm parameter. When set to false, ZTM checks run. When true (default), they are skipped.
User Operations
| Endpoint | Method | Description | Action Type |
|---|---|---|---|
/v1/user/create | POST | Create a new user (KYC) | user_create |
/v1/user/id | PATCH | Edit user information | user_update |
Account Operations
| Endpoint | Method | Description | Action Type |
|---|---|---|---|
/v1/account/create | POST | Create a new account | account_create |
/v1/account/id | PATCH | Edit account details | account_update |
/v1/account/id/editAccountFeatures | PATCH | Edit account features | account_update.features |
/v1/achaccount/create | POST | Link an ACH account | ach_account_create |
Transaction Operations
| Endpoint | Method | Description | Action Type |
|---|---|---|---|
/v1/transaction/createAchTransfer | POST | Create an ACH transfer | transaction_ach_create |
/v1/transaction/createA2ATransfer | POST | Create an A2A (P2P) transfer | transaction_a2a |
/v1/transaction/createTransaction | POST | Create a transaction (BYOP) | transaction_create |
/v1/transaction/createAdjustment | POST | Create an adjustment | adjustment_create |
Card Operations
| Endpoint | Method | Description | Action Type |
|---|---|---|---|
/v1/card/id/activate | POST | Activate a card | card_activate |
/v1/card/id/status | PATCH | Modify card status | card_update.status |
/v1/card/id/reissue | POST | Reissue a card | card_update.reissue |
/v1/card/id/replace | POST | Replace a card | card_update.replace |
/v1/card/id/mobileWalletProvisioning | POST | Provision mobile wallet | card_update.mobile_wallet_provisioning |
/v1/card/id/pinChangeToken | GET | Get PIN change token | card_update.get_card_pin_change_token |
/v1/card/id/displayUrl | GET | Get card display URL | card_update.get_display_url |
Entity Operations
| Endpoint | Method | Description | Action Type |
|---|---|---|---|
/v1/entity/create | POST | Create an entity (KYB) | user_create_entity |
For the full API reference, see docs.gospidr.com/reference. For SST guidance, see the SST User Guide.
Updated 5 days ago