
SST User Guide
Overview
The Spidr Service Tool (SST) is an application that allows Spidr customers to handle account maintenance and operational activities for their end users. SST users can view and update account information, review transactions, triage potential fraud, and perform other key support activities.
SST is powered by Spidr’s Unified API, providing seamless real-time updates and information for all end users within a given program. For more information on Spidr’s Unified API, please refer to Spidr's API docs.
SST Access
Prerequisites for accessing SST
Before inquiring about SST access, please confirm the following:
- A member of your company has signed up via the Spidr Dev Portal: https://devportal.gospidr.com/.
- A company has been created, and an API key has been generated via the Dev Portal. Your company must also be promoted into the CV environment (SST access is not provided in Sandbox).
- Your company has completed the 'Spidr Connectivity Guide' which defines whitelisted IPs for CV and Production access (including SST).
- For more information, see Getting Started with Spidr.
SST Invites
Spidr team members will provision SST access and send out invites once your company is ready. Reach out to a Spidr team member via Slack or the Spidr Help Desk to request SST accounts. You’ll need to provide the user’s first and last name, email, and desired role. See SST Roles for information on roles.
SST Walkthrough
The following sections cover how to navigate and use SST's key screens and functionality.
Please Note
Some features below require ZTM provisioning and may not be available for all programs. See the Spidr ZTM Reference Guide or contact a Spidr team member for details.
Logging in to SST
After a Spidr team members adds you to SST, you’ll receive an SST verification email. Click the link in the email to verify your account. After successfully verifying, you’ll see a 'success' message.
A Spidr team member will provide you with a temporary password. Login with the provided password via https://sst.cv.gospidr.com/.
Upon logging in, you’ll be navigated to the SST homepage.
SST Homepage
From the SST homepage you can select a company (if you are associated with more than one), as well as see any announcements/important info. Click the 'Select a company' dropdown and pick a company to get started.
After selecting a company, you'll be navigated to the 'Users' screen.
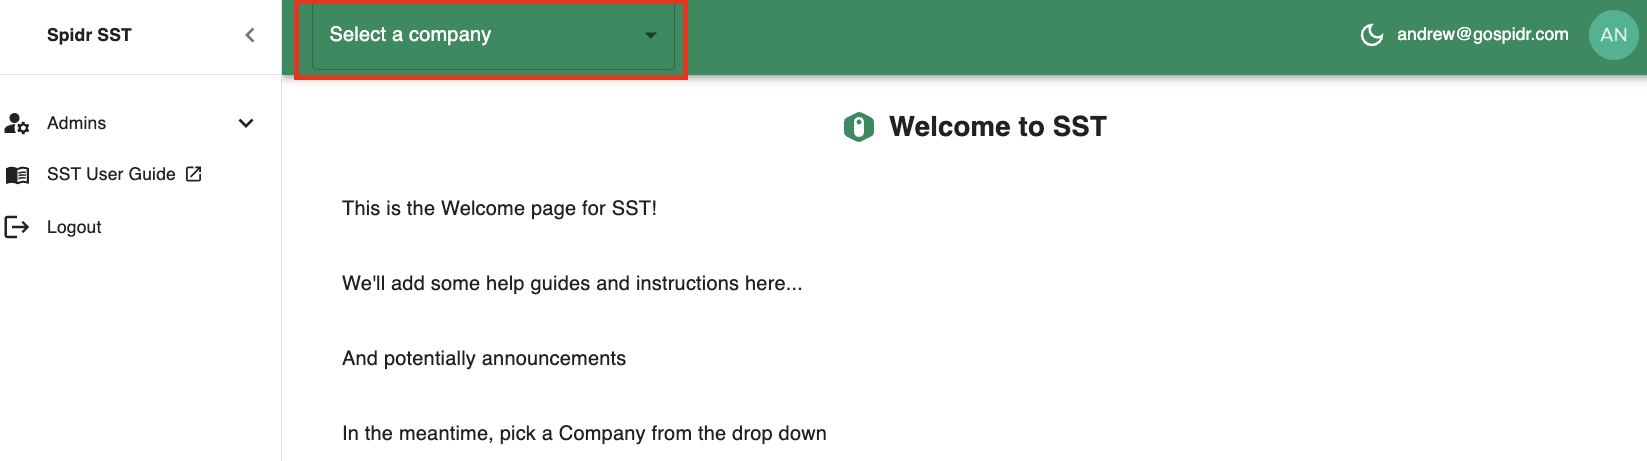
SST Homepage
Users
Once you are on the 'Users' screen within SST, you'll see three major components:
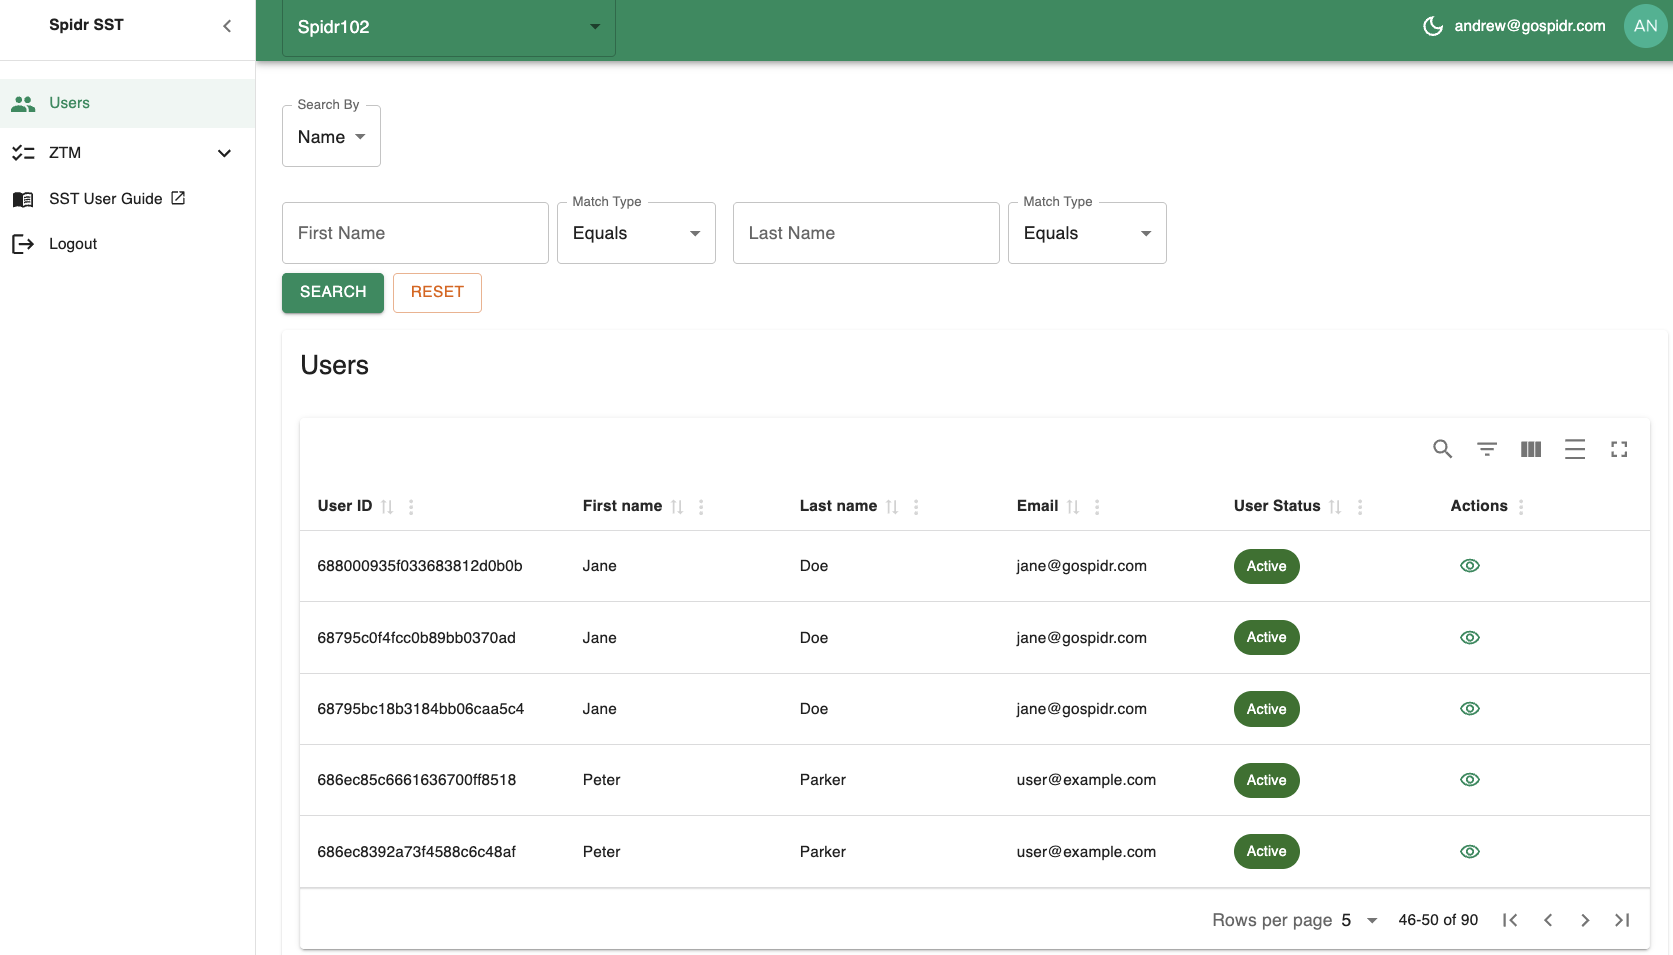
Users Screen
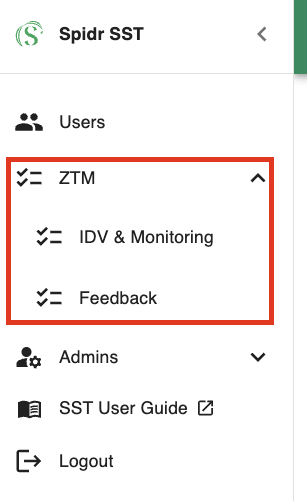
- The sidebar, which provides access to:
- The list of 'Users' associated with your company (current screen)
- ZTM. Contains 'IDV & Monitoring' and 'Feedback' tabs. The 'Feedback' tab collates the list of user, account, or transaction actions needing feedback due to auto-decisioning. The 'IDV & Monitoring' tab contains all onboarding sessions if you are using identity verification (IDV) through Spidr. These queues are only applicable if you are enrolled in ZTM. For more information on the ZTM queues, see ZTM Queues. See Spidr ZTM Reference Guide for an overview of ZTM.
- Quick access to the user guide (this guide)
- Logout button
- The header, which contains:
- Spidr SST link in the top left to navigate back to the homepage
- Company selector (only applicable if you are associated with multiple companies)
- Currently logged in SST user info. Pro tip, you can press the sun or moon icon to instantly turn on light/dark mode.
- The 'Users' table, which contains a list of all users that have been created for your program.
- You can search for users by specific fields as well as choose the type of match for searching (equals, contains, starts with, ends with).
- All tables within SST support advanced sorting, searching, and filtering. You can even show/hide columns as needed or make the table fullscreen.
Click on the 'eyeball' icon in the 'Actions' section to see more details for a given user via the 'User Details' screen.

View User Details Icon
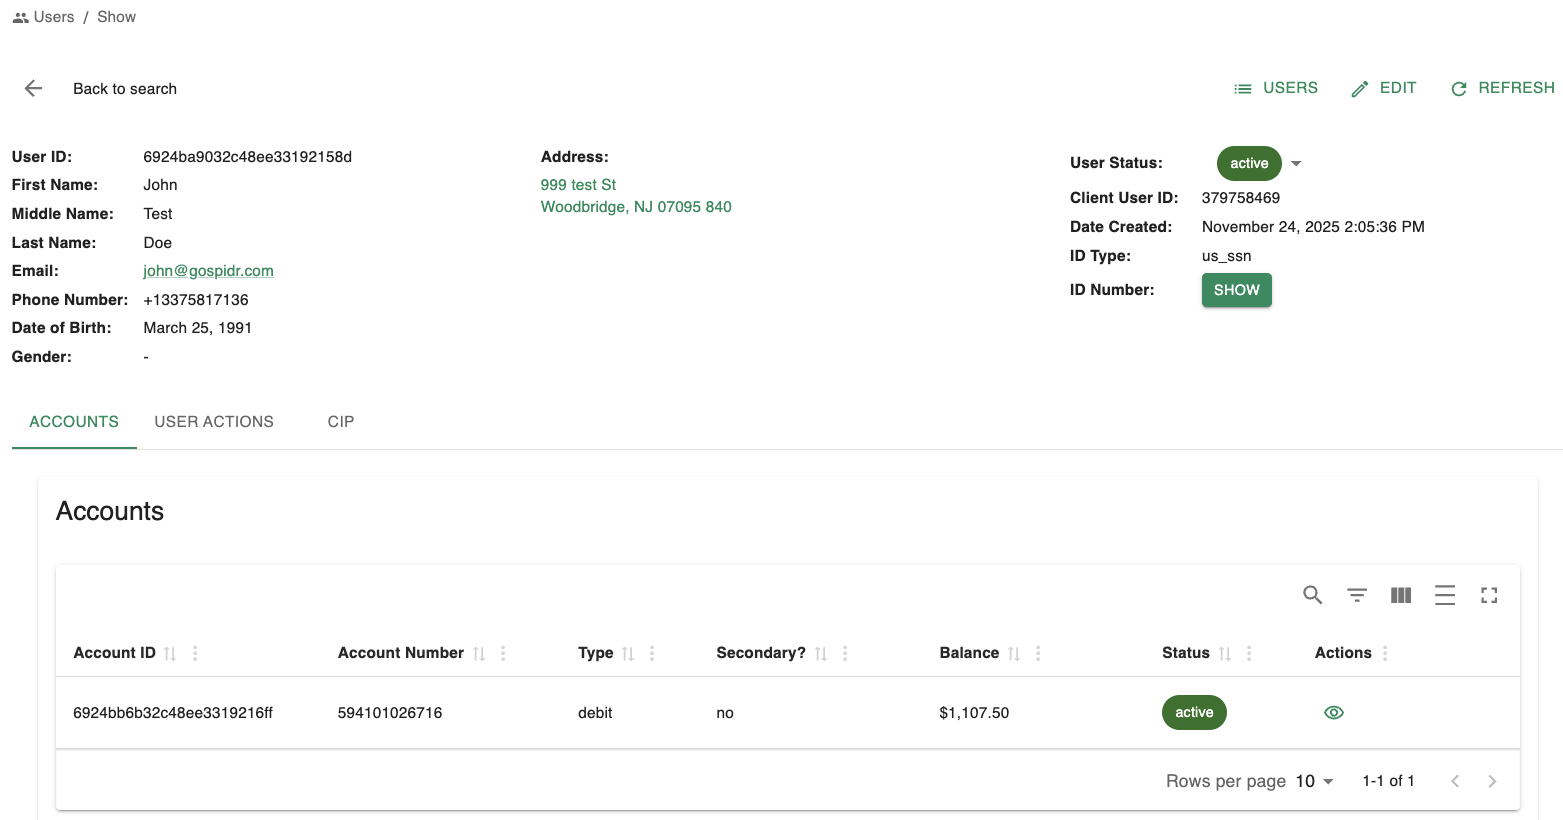
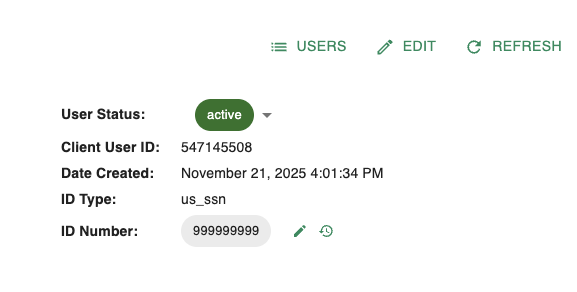
User Details
The 'User Details' screen contains the user's full information, as well as a list of accounts connected to the user. For more information on 'user' vs. 'account' see here. This screen allows you to:
- Update the 'User Status'
- Edit the user's personal information (depending on your SST role)
- Validate or show the user's ID number (depending on your SST role)
- View a list of accounts attached to the user
- View actions associated with the user
- View 'CIP' (Customer Identification Program) details if applicable (e.g., Watchlist hits, IDV status).
User Details Screen
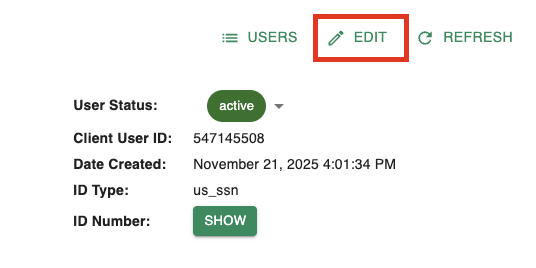
Edit User Info
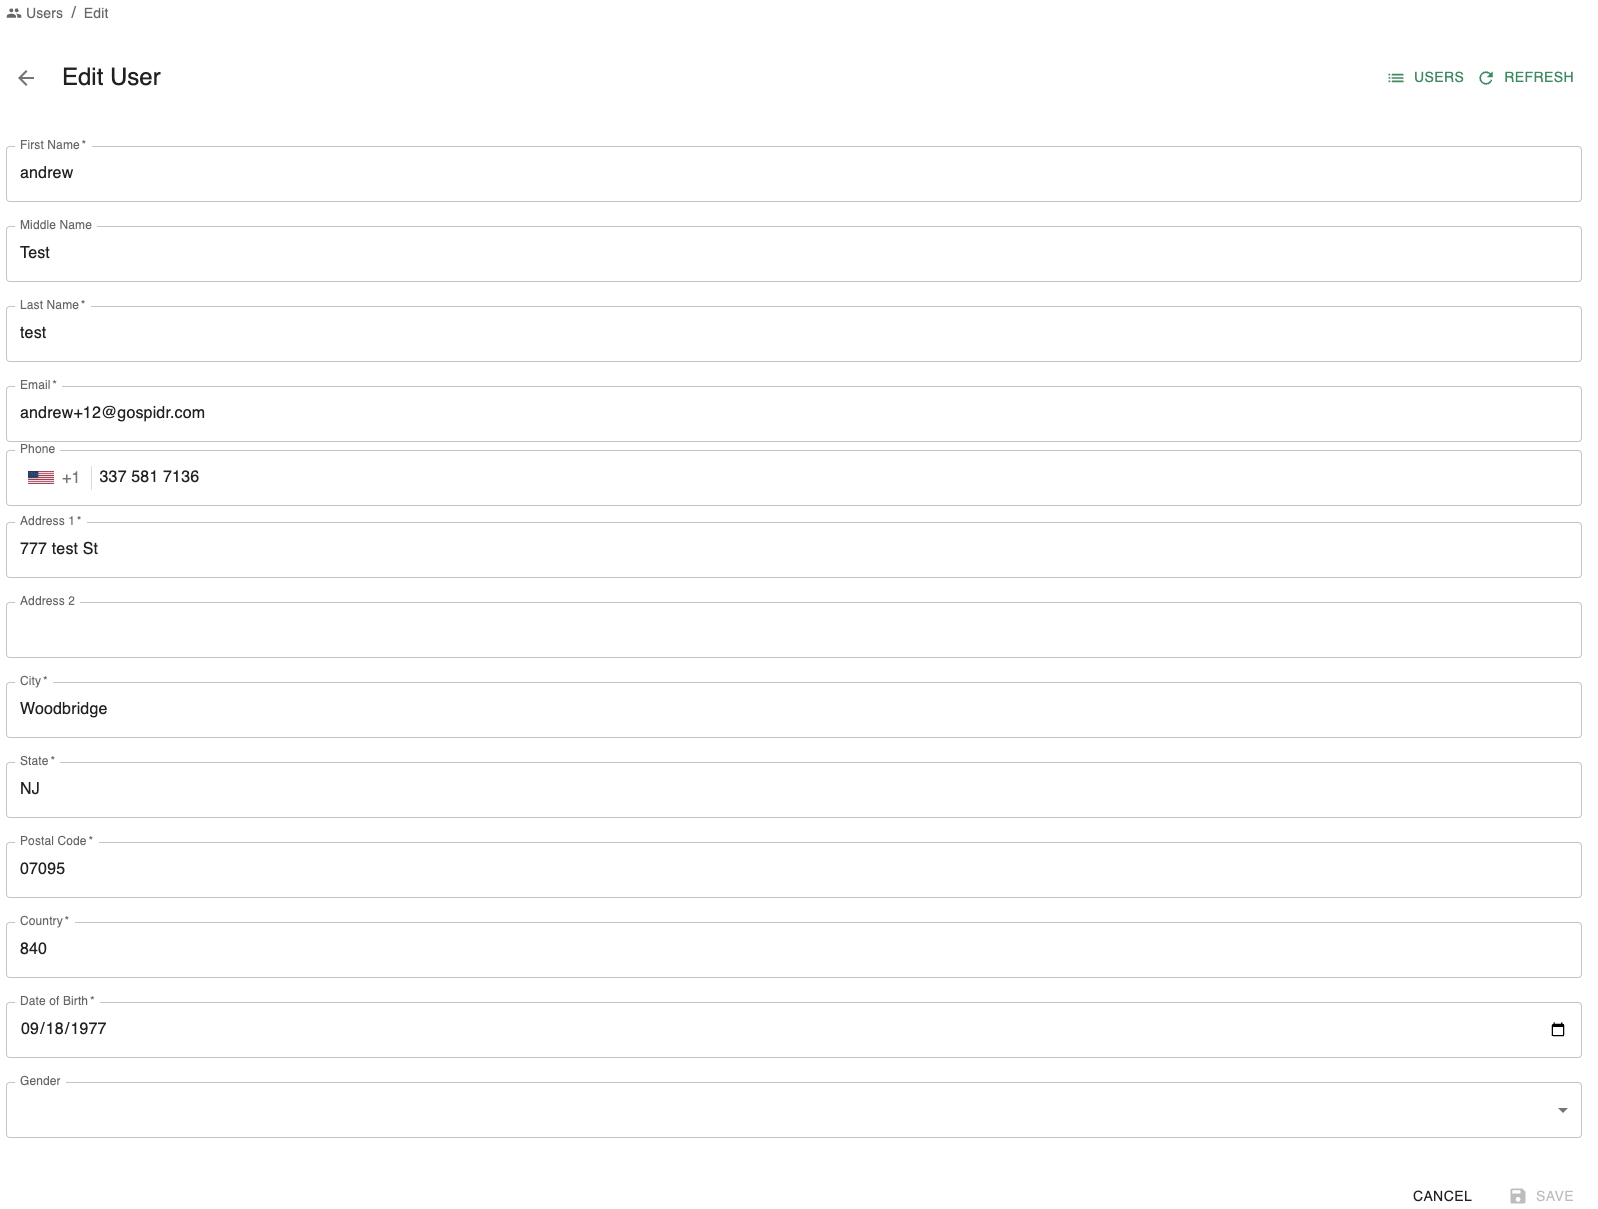
If you have the requisite permissions, you can edit the personal information attached to the user. Tap the 'Edit' button at the top right to see/edit the user's full information.
'Edit User' Button
After clicking the 'Edit' button you'll be navigated to the 'Edit User' screen. You will be permitted to update different information depending on your role. Click 'Save' once you are finished to save the changes.
Edit User Screen
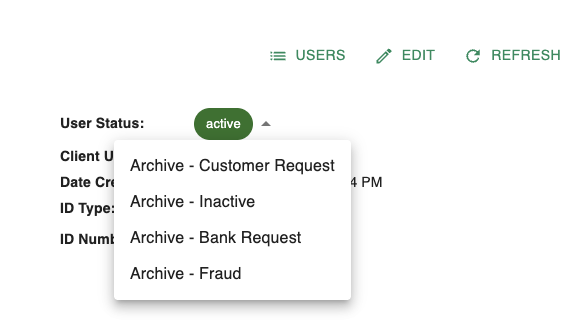
Update User Status
You can also update a user's status via this screen. Click the status chip in the 'User Status' field to update the status.
Update User Status
Please Note:You can only update a user to an 'Archive' status if all their associated accounts are also closed. Once a user is archived, another user can onboard using the same ID number. It's a way to 'soft-delete' a user without actually deleting the data on file.
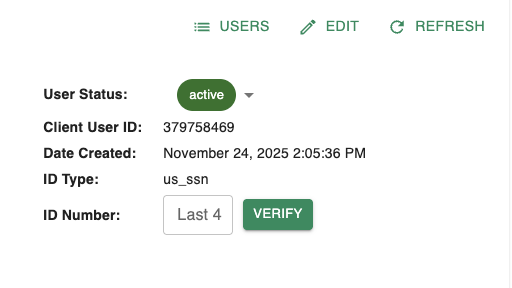
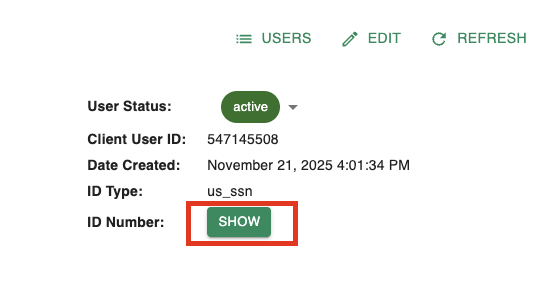
View/Validate SSN (or other ID Type)
Depending on the program, SSN, ITINs, or other 'ID types' may be used as the primary ID for customers. As an Agent/CS Manager, you can validate the last 4 of an ID type for customer verification purposes. Compliance roles can see the full SSN.
Verify Id Number (Agent/CS Manager)
Show ID Number (Compliance Role Only)
ID Number Revealed (Compliance Role Only)
Note:
Compliance roles can also view an audit log of 'ID Number' changes by clicking the 'clock' icon. This log contains the old/new value as well as who performed the update (if performed within SST).
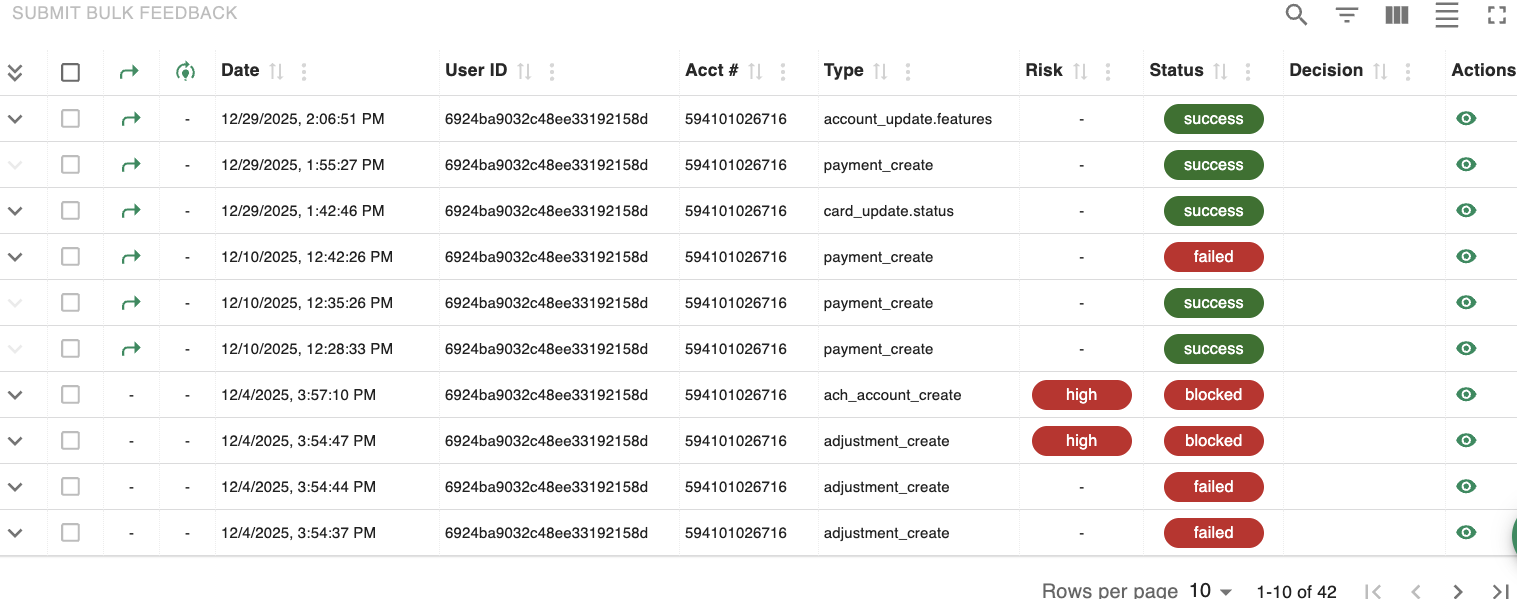
Review User Actions
The 'User Actions' tab serves as an audit log of all activity related to the user. An action is recorded whenever your app or SST interacts with the user — whether it’s updating information, fetching data (like a card image), or performing any other request.
If the user is associated with more than one account, all account-related actions will also appear in this tab (transactions, ACH account linking, etc.).
For more information on viewing action details see Review Action Details.
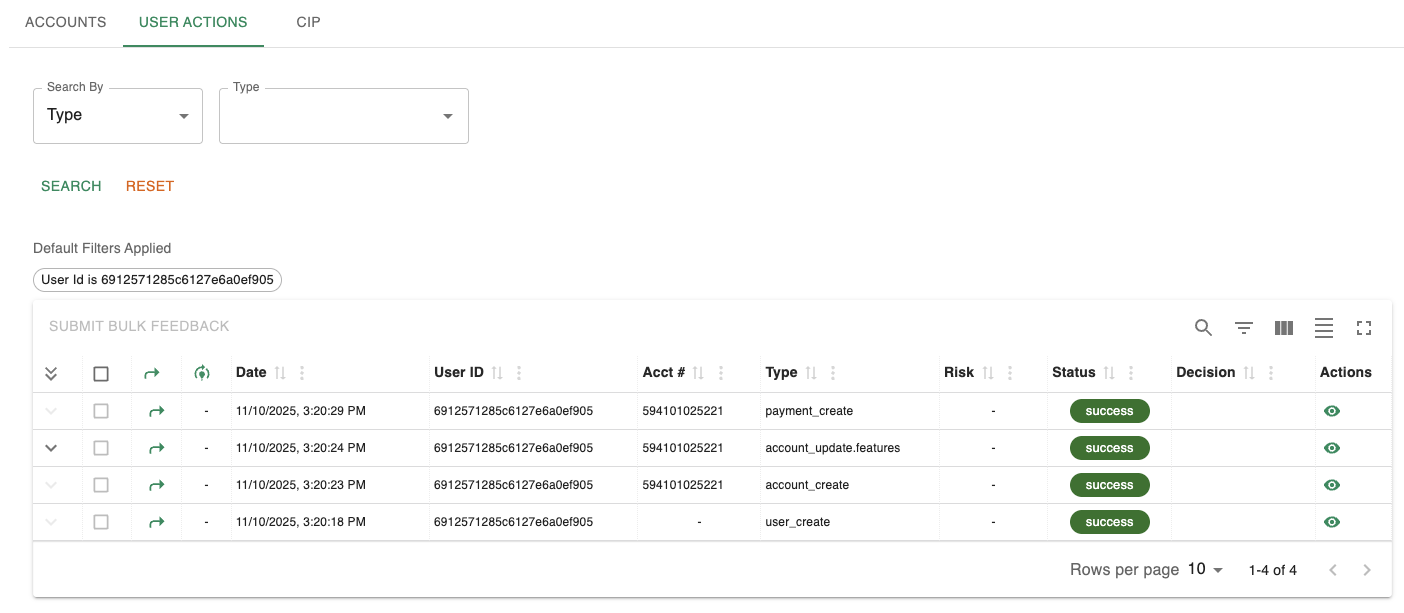
Example User Actions
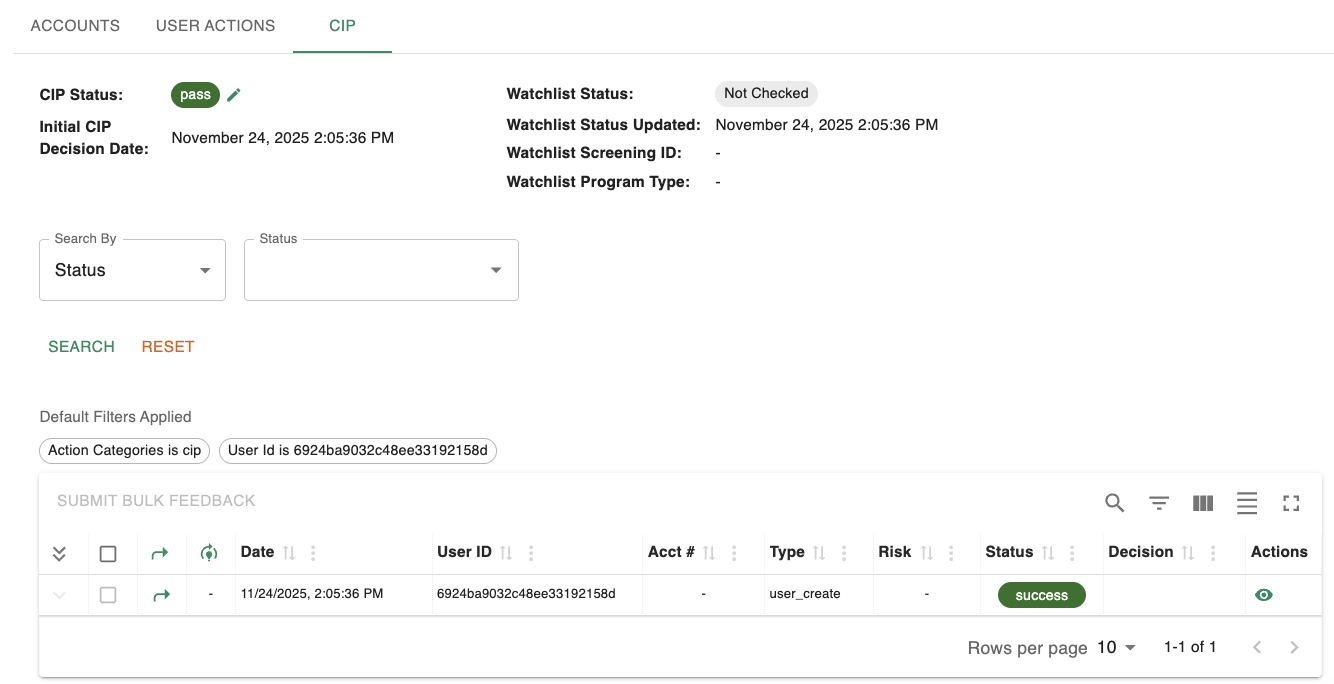
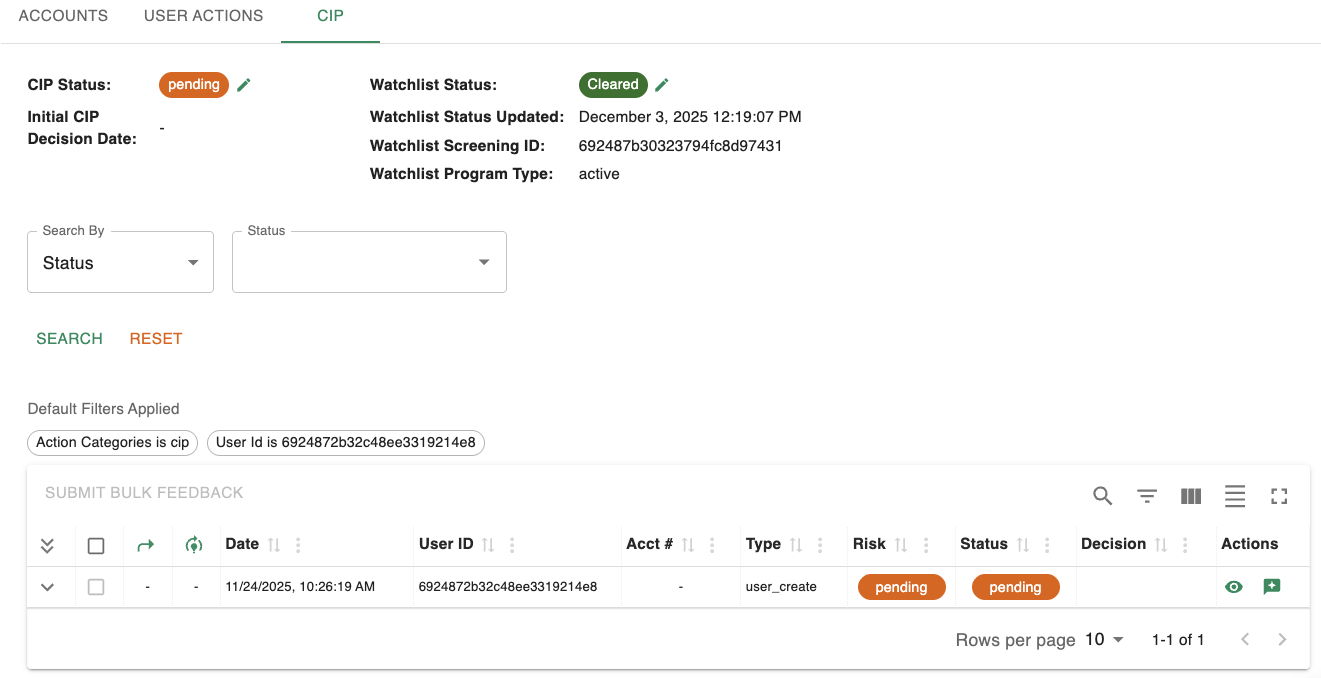
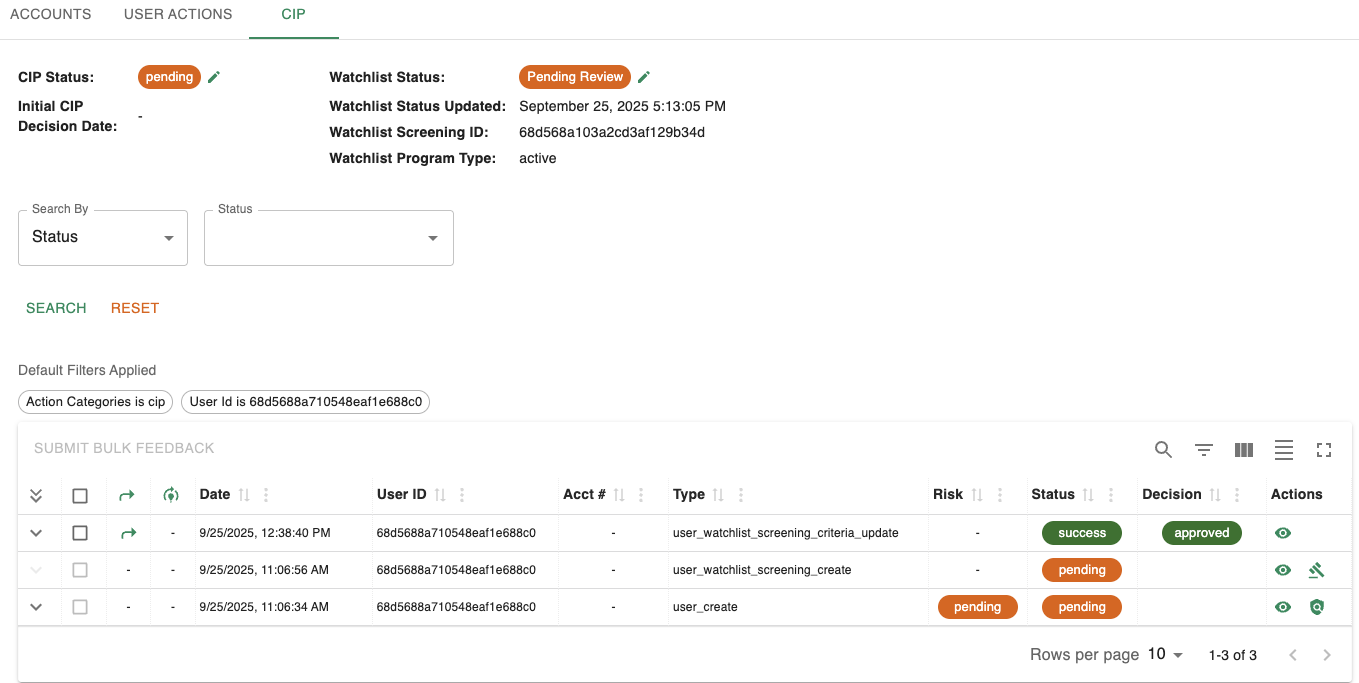
CIP Tab
If your program is enrolled in Spidr's IDV and/or watchlist product, you'll see a dedicated Customer Identification Program (CIP) tab on the 'User Details' screen. This tab surfaces key information such as IDV status, watchlist screening status, and related timestamps. The tab is read-only for most roles and is primarily used by Compliance to review onboarding sessions and watchlist monitoring.
CIP Tab
When you click into the 'CIP' tab you will see two sections:
- CIP Status and Decision Date
- Shows the current CIP Status for the user (e.g.,
Pending,Pass,Fail) as a colored chip. - Shows the Initial CIP Decision Date, which is when a pass/fail determination was made.
- The CIP Status is typically automatically updated per the manual review and decisioning flow detailed below.
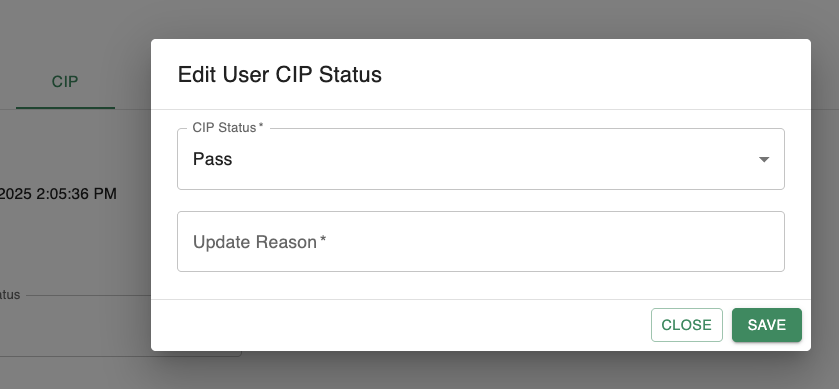
- For eligible roles, an Edit icon next to the status opens an Edit User CIP Status modal where you can:
- Select a new CIP status (
PassorFail). - Provide a required Update Reason (up to 255 characters).
- Submit the change, which is then recorded via the Unified API and reflected in SST.
- Select a new CIP status (
- CIP status can only be updated if:
- The current CIP status is not
Pending. - The user does not have a confirmed or pending watchlist hit.
- The current CIP status is not
- Shows the current CIP Status for the user (e.g.,
Please note:
A Spidr account can only be created for users with a 'CIP Status' of 'pass'
'Edit User CIP Status' Modal
- Watchlist / Sanctions Screening - if your IDV program entails watchlist screening, a summary of the watchlist checks will be located in this section.
- Shows the current Watchlist Status (for example,
Not Checked,Pending Review,Confirmed) and the last Watchlist Status Updated timestamp. This status is automatically updated per confirming or dismissing watchlist hits. Appropriate roles can also manually update the watchlist status. - Displays the Watchlist Screening ID and Program Type
- If the watchlist status is
Pending RevieworConfirmed, this will prevent manual 'CIP Status' changes until the watchlist action has been fully reviewed and resolved.
- Shows the current Watchlist Status (for example,
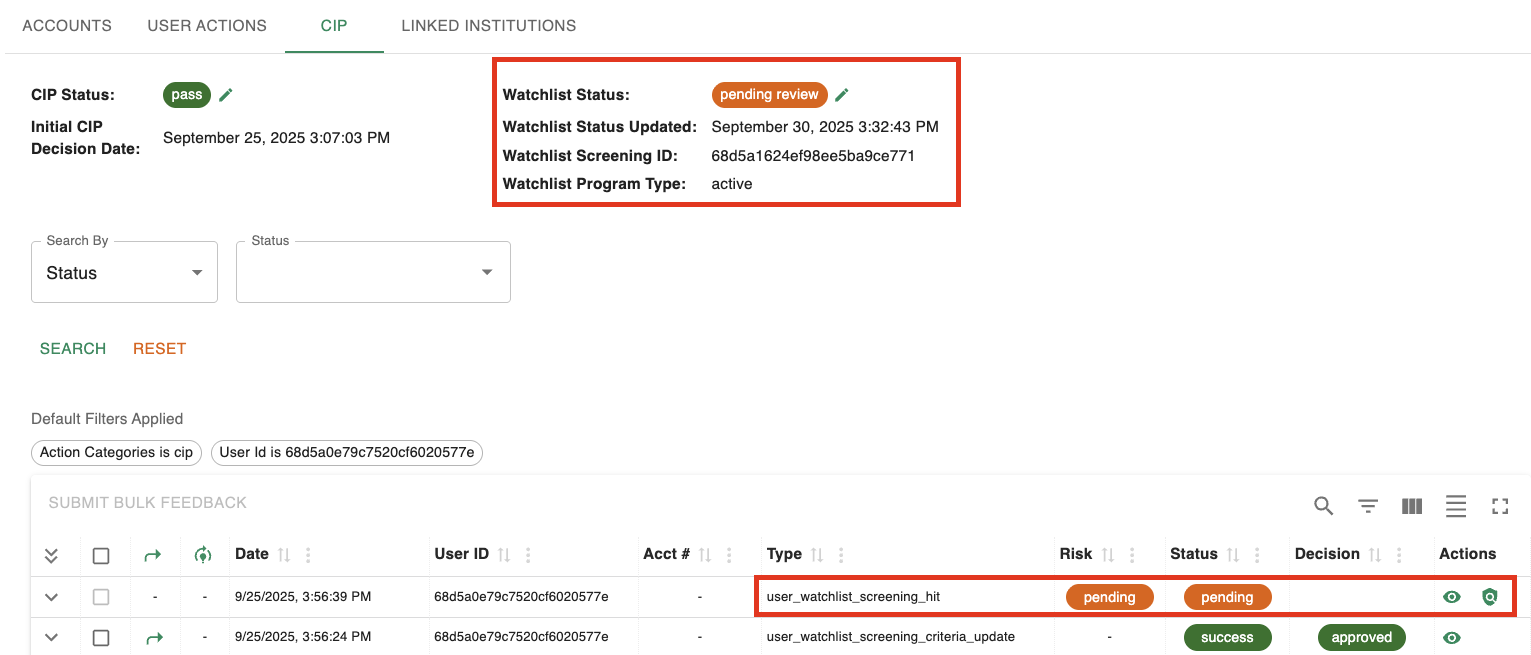
Example Watchlist Status and Hit
For more information on using the IDV and Watchlist sections within SST, please see IDV Manual Review and Decisioning and Watchlist Review.
Linked Institutions
The 'Linked Institutions' tab displays all external financial institutions that are linked to the current user. Not all programs will see this tab as it is a ZTM offering requiring specific configuration. Linking an institution provides access to one or more institution accounts that can be used for ACH account creation, verification, and/or balance checking via the Unified API.
For guidance on linking institutions, see Create Linked Institution Session.
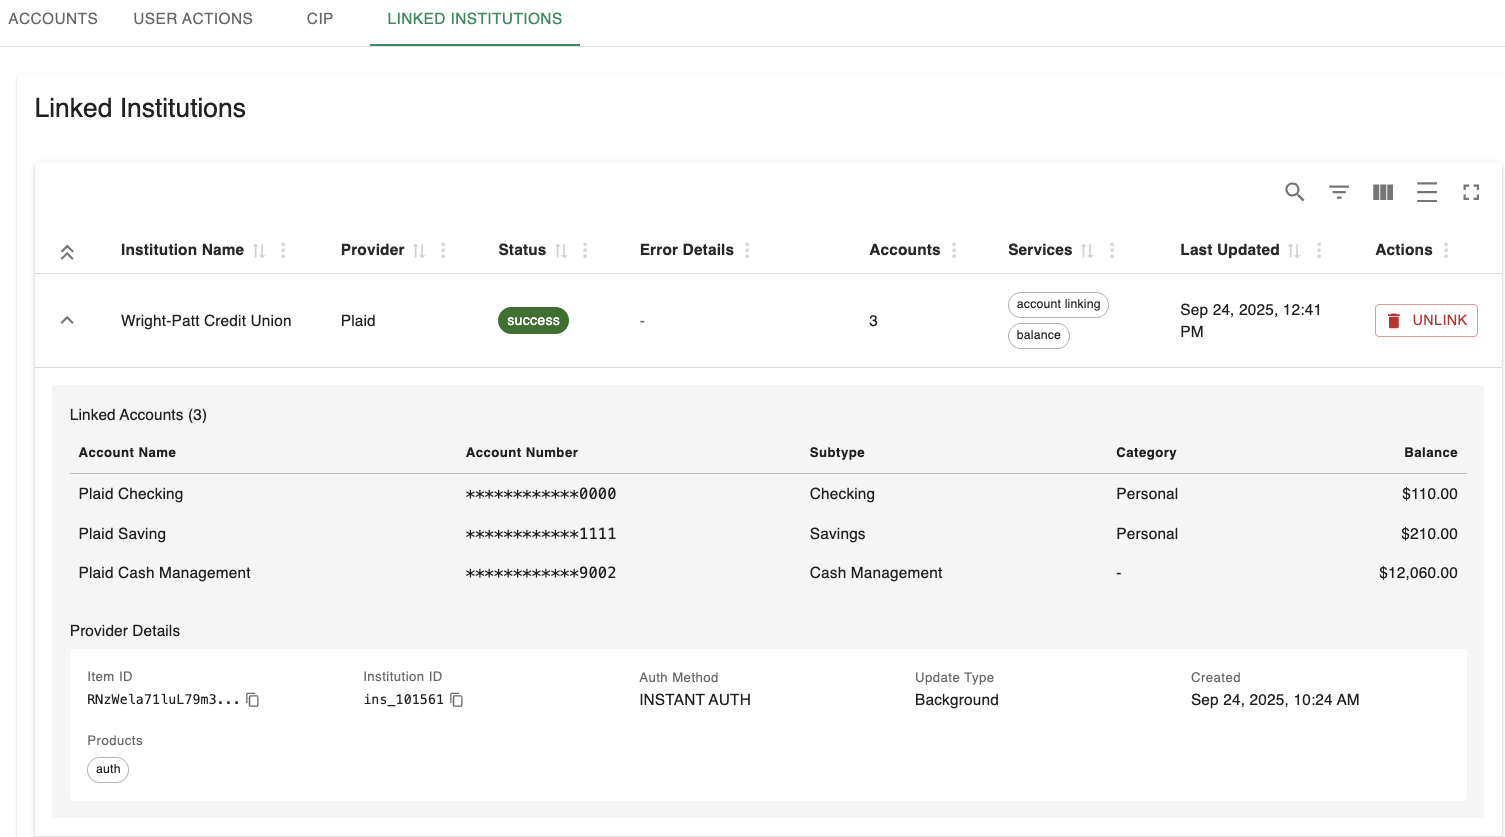
Linked Institution Example - Provider: Plaid
The 'Linked Institutions' tab allows you to review all linked institutions and underlying accounts, as well as all associated institution metadata. You can 'unlink' an institution via the 'Unlink' button in the 'Actions' column.
If an ACH account was created using a linkedInstitutionAccountId, you can view the associated linked institution via the 'View' link on the 'ACH' tab.
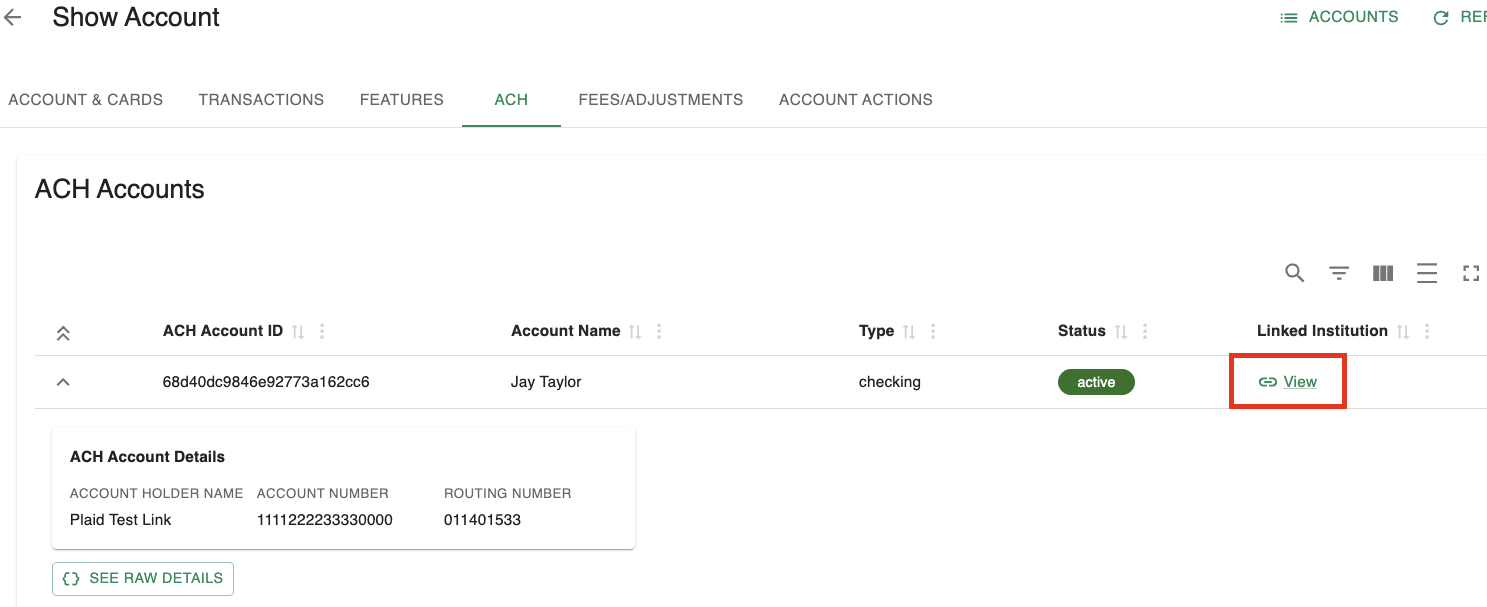
Linked Institution 'View' Example
Accounts
Click the 'eyeball' icon on an account row in the 'Users' screen to navigate to the account associated with a user.
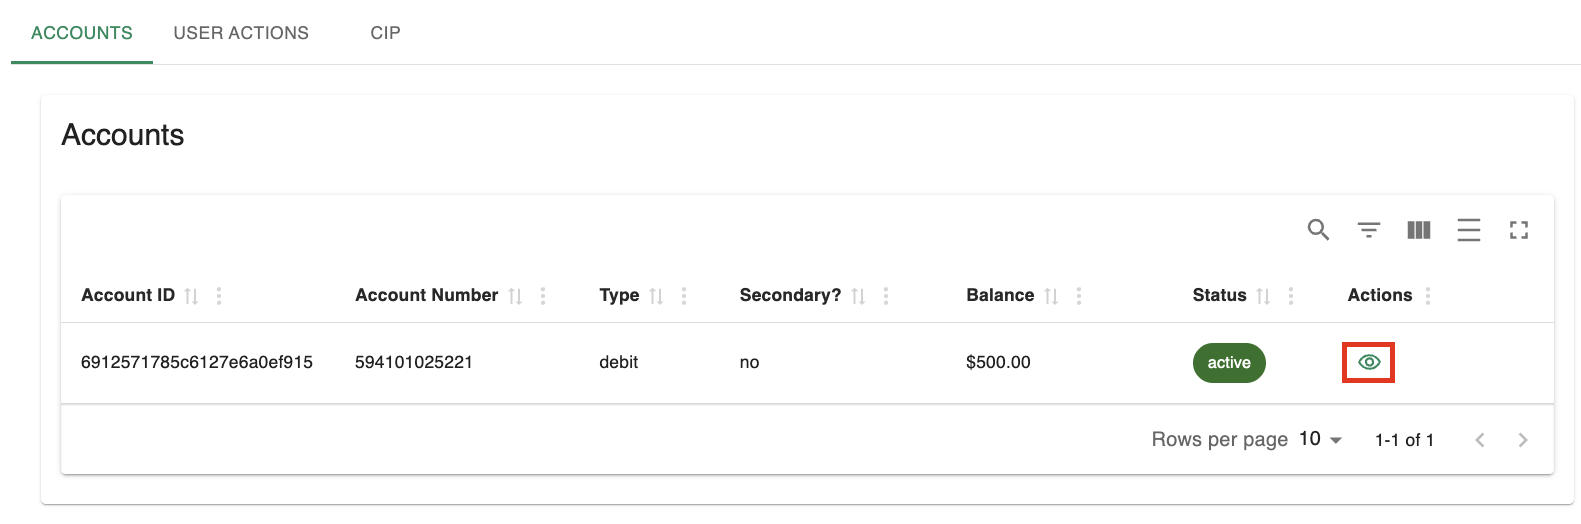
View account details icon
Account Details
Clicking on any account listed in the 'User Details' screen will navigate you to the 'Account & Cards' screen. This is where you can manage specific financial products associated with the user.
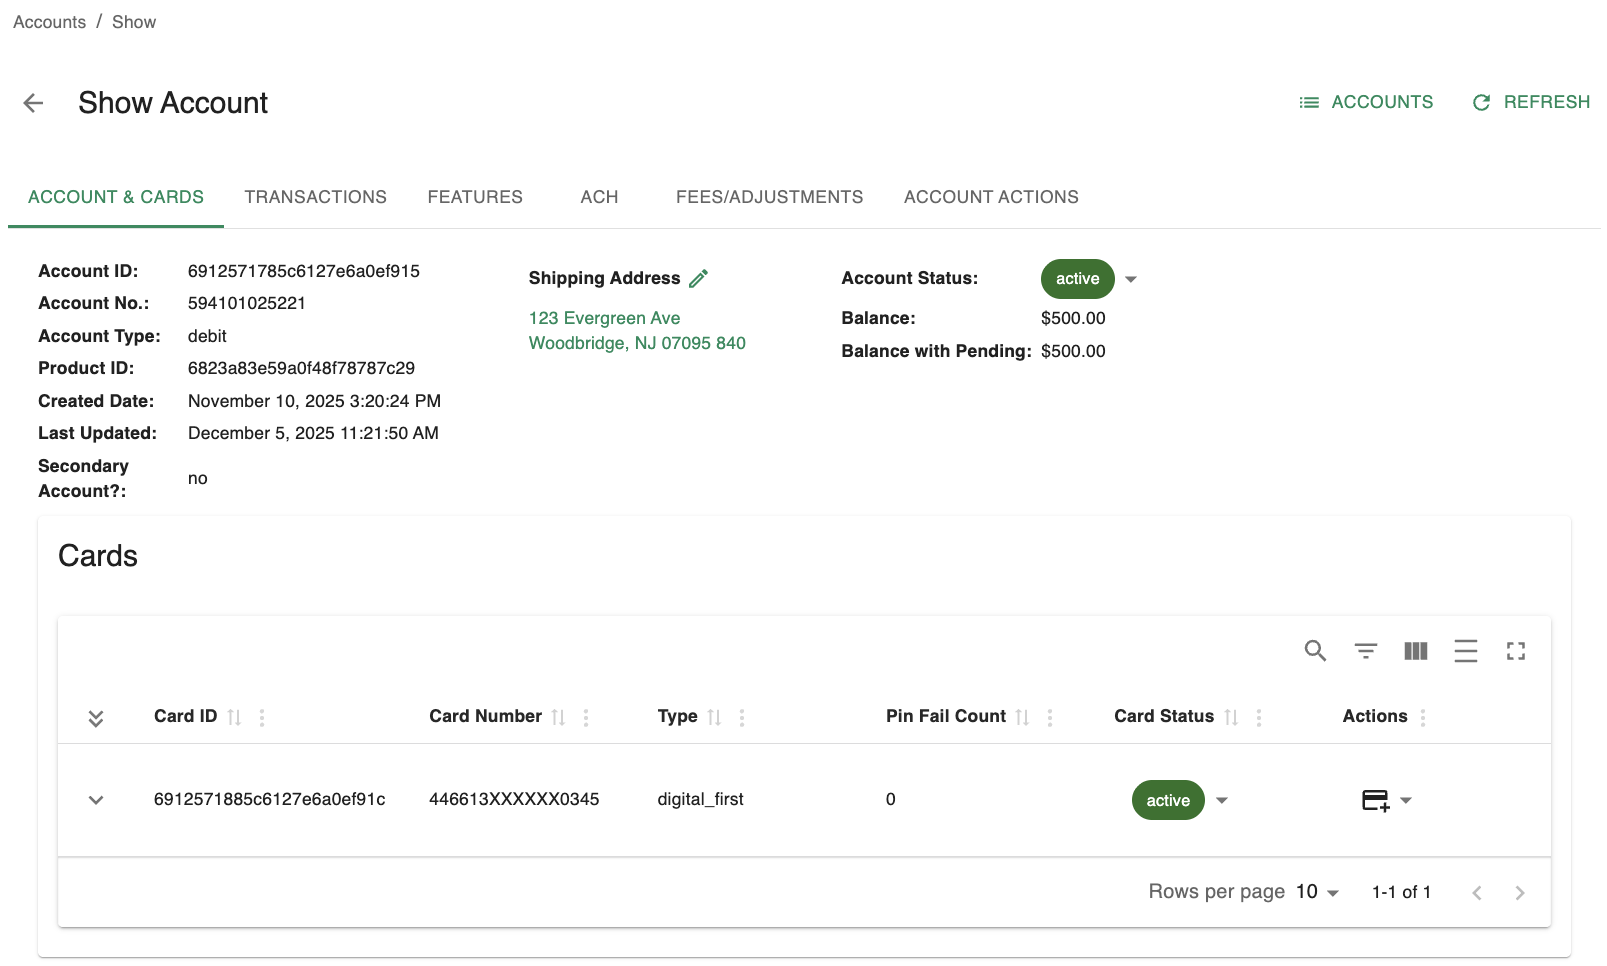
Account & Cards Screen
The screen is divided into several tabs:
- Account & Cards:
- View account and basic card information. You can edit the shipping address and account status.
- See a list of issued cards. Accounts typically only have one card in an 'active' status at a time.
- Perform card actions like 'Replace' (Lost/Stolen), 'Reissue' (Damaged), or 'Freeze'.
- Transactions:
- View a searchable history of all transactions.
- Expand transactions to see raw provider details (useful for troubleshooting).
- Features:
- View and toggle enabled features for the account (e.g., international transaction blocking).
- Configure specific card controls if supported by the program.
- ACH:
- View connected ACH accounts and ACH transaction history.
- Note: This page only tracks ACH originations.
- CS Managers can cancel pending ACH originations.
- View connected ACH accounts and ACH transaction history.
- Fees/Adjustments:
- Manually issue adjustments or charge fees to the account.
- Note: Fee and adjustment types will be configured per your funds flow and program setup.
- Manually issue adjustments or charge fees to the account.
- Account Actions:
- Review actions specific to this account. The Account Actions tab works the same way as User Actions, but is pre-filtered to only show actions that involve the selected account (for example, transactions, ACH accounts, or card updates).
- You can open an action to see additional details, make a decision, or submit feedback, depending on your role, the status of the action, and if the action entailed risk checks (only applicable to programs enrolled in ZTM). For more information on viewing action details see Review Action Details
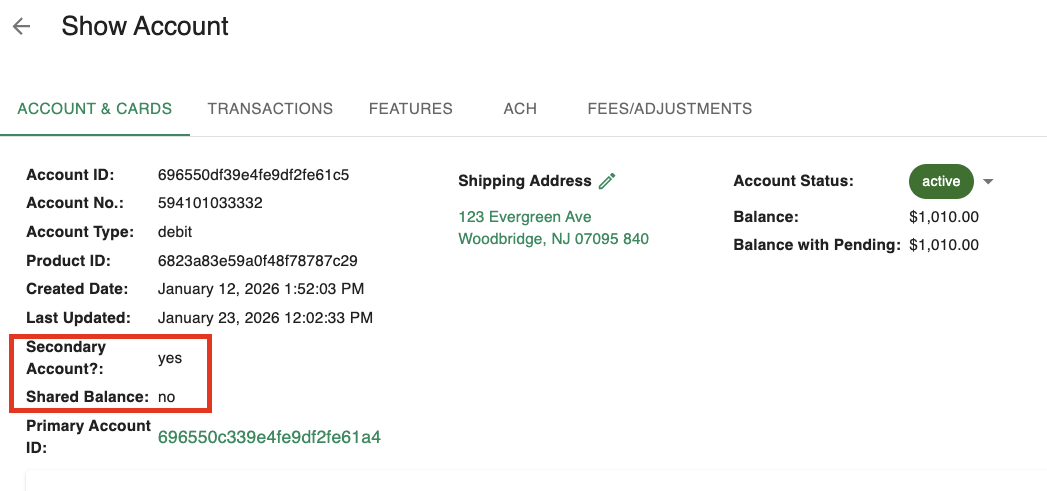
Secondary/Linked Accounts
Spidr supports two account types: primary and secondary. Primary accounts are the default and are created when no primaryAccount parameter is provided on account create. Secondary accounts are linked to an existing primary account. To create a secondary account, pass the primary account's ID in the primaryAccount parameter when calling account create.
Secondary accounts may or may not share a balance with a primary account and are typically created to support the following scenarios:
- Minor accounts
- Joint/spouse accounts
- Authorized users
- Secondary 'save' accounts
If an account is linked to one or more accounts (either as a primary or secondary), you will see a 'Linked Accounts' section on the 'Account & Cards' tab.
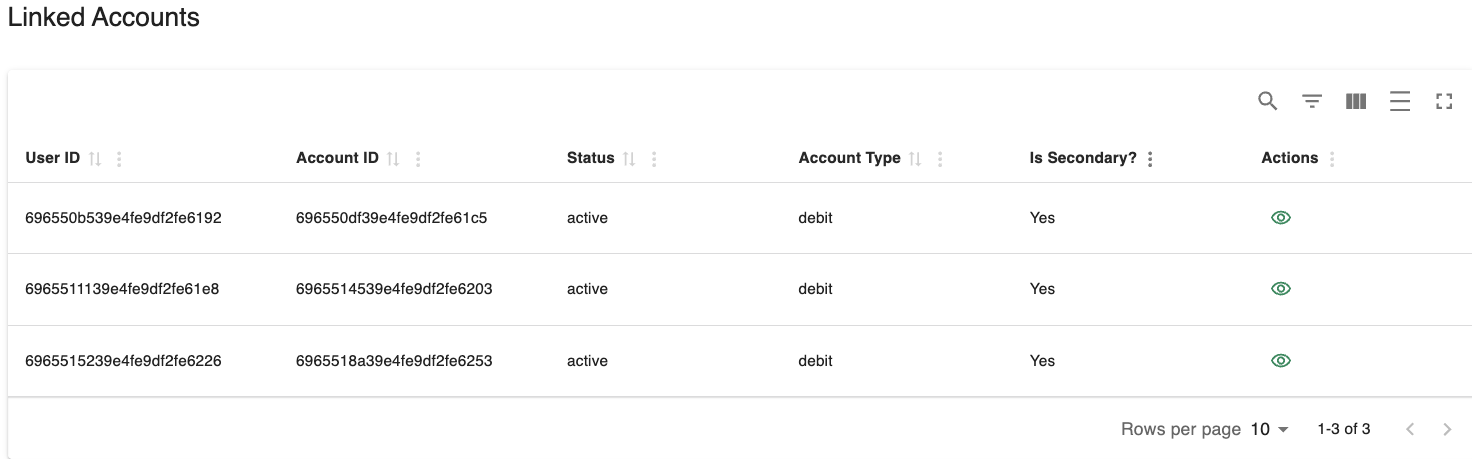
Example 'Linked Accounts' section
Each of the linked accounts can be identified as either a primary or secondary via the 'Is Secondary?' column. You can also navigate directly to the linked account by clicking the 'eyeball' icon in the 'Actions' column.
After navigating to a secondary account, use the 'Shared Balance' field to note whether the account shared their balance with the primary account.
Example Secondary Account with 'Shared Balance' of 'no'
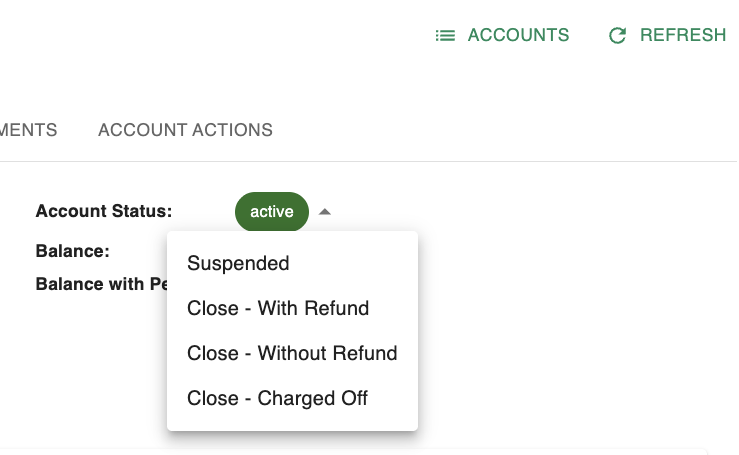
Update Account Status
Click the chip next to the 'Account Status' field to change the account's status.
Update Account Status
See Card and Account Statuses for a breakdown of status and meaning.
Please note
The 'Close' statuses are terminal. Any account that is closed cannot be reopened (the customer must reapply and re-onboard).
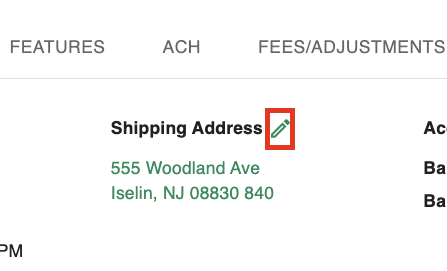
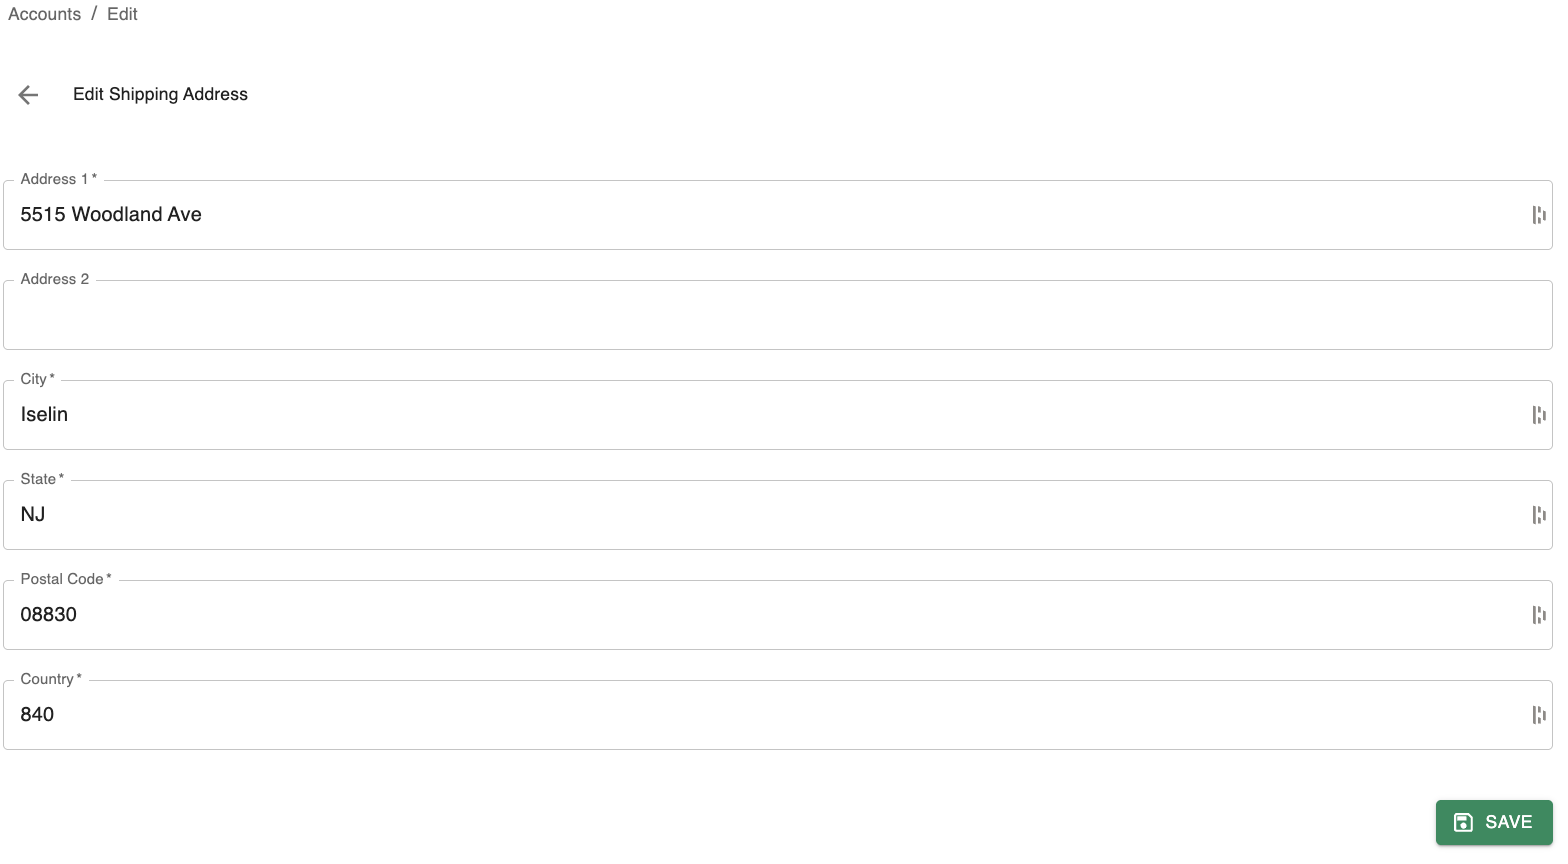
Update Account Shipping Address
Shipping addresses are maintained per-account and can be updated at any time by both the 'CS Manager' and 'Compliance' roles. Agents may only update the shipping address if an account is older than 30 days. See SST Role Capabilities for more information.
To update the shipping address, click the 'pencil' icon next to the 'Shipping Address' field. Update information as needed and click 'Save.'
Shipping Address 'Edit' Icon
Shipping Address Fields
Card Controls
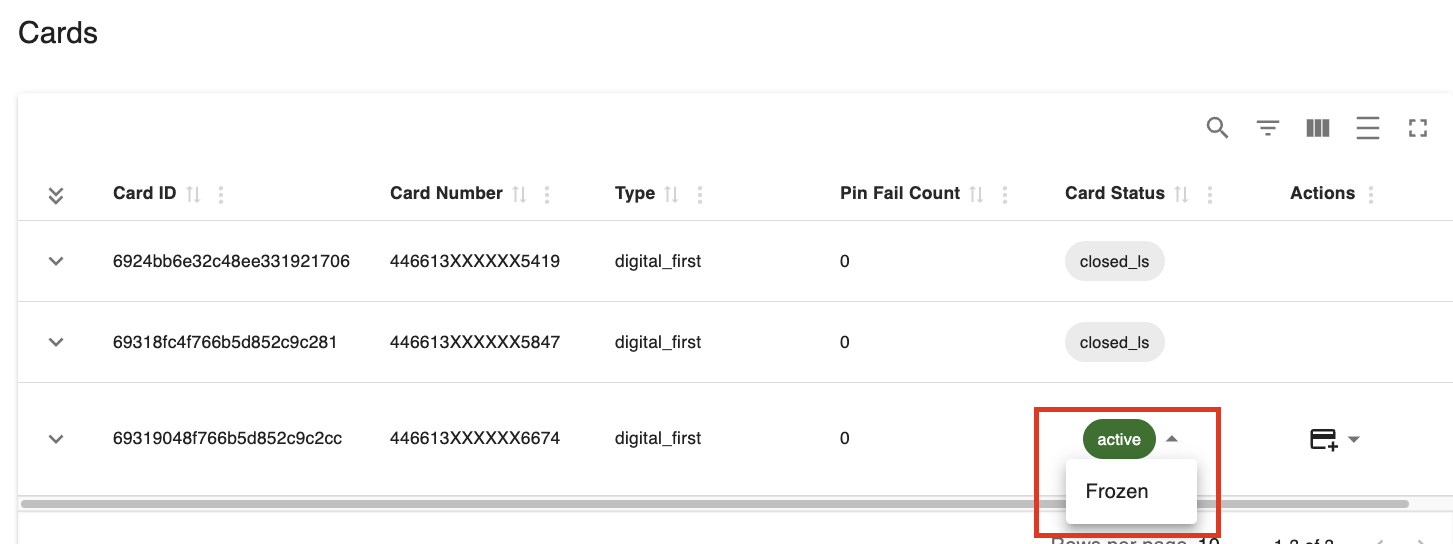
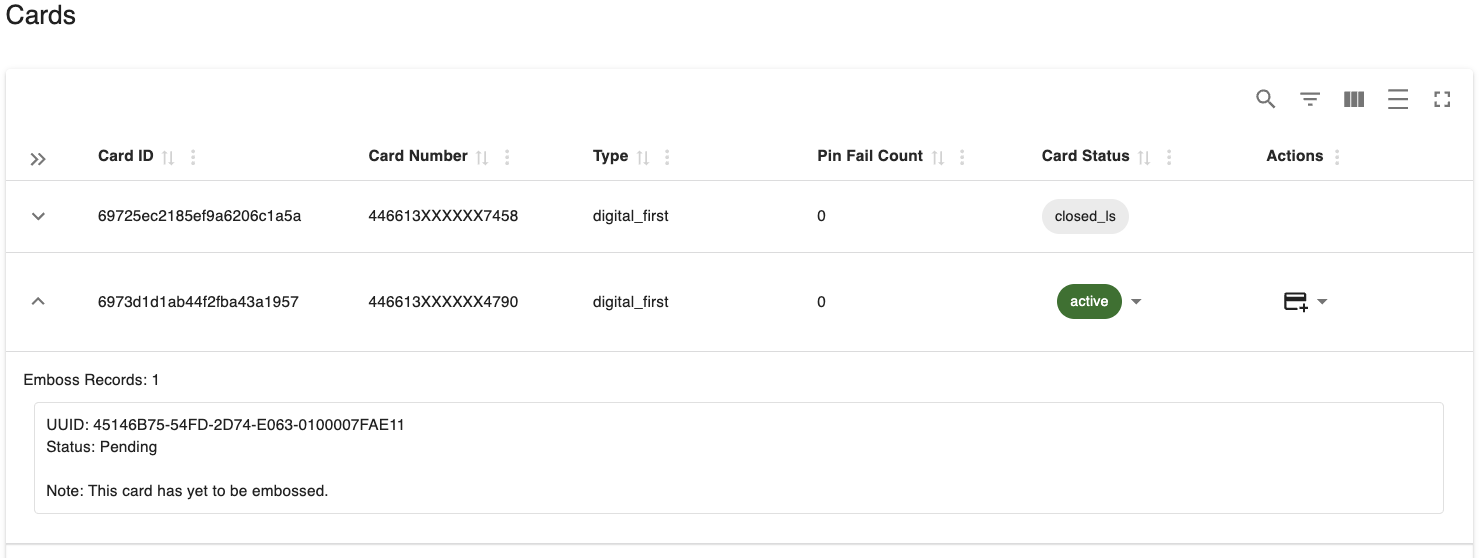
The 'Cards' section allows you to see a list of all cards associated with the given account. You may expand each card row for embossing details, freeze the card, reissue it, or mark it as lost/stolen via this table.
Freeze the card
When a card is frozen, it cannot be used for transactions through the auth stream such as:
- Authorizations (purchases, including recurring transactions)
- Completions
- Reversals
- Merchant credits
- Card loads (except Green Dot and Western Union)
The following transactions are still permitted while the card is frozen:
- Settlements
- ACH
- Billpay, including scheduled transactions
- Direct deposits
- Funds movement initiated by API calls using funds flow codes (payments, adjustments, and fees)
- Provisional credit and other dispute-related money movement
- Green Dot and Western Union card loads
To freeze the card, click the chip in the 'Card Status' column. You will be presented with a confirmation modal, click 'Yes' to proceed with freezing the card.
Freezing the Card
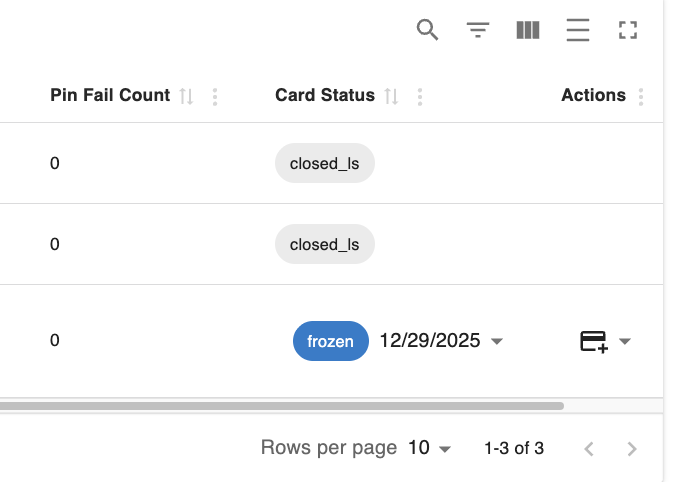
The date of the card freeze will be displayed next to the 'frozen' status.
Frozen Status and Date
To unfreeze a card, simply select the dropdown chip next to the frozen date and select 'Active.'
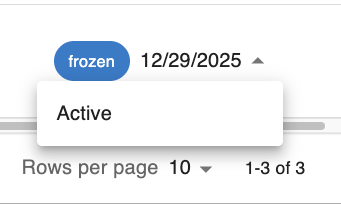
Unfreeze Card
Reissue Card
If a card is reported as damaged, you can reissue it via the 'card' icon in the 'Actions' column. Reissuing a card generates a new version of the existing card. This newly generated version retains the same PAN and Card ID (CAD). The card receives a new expiry date and CVV, and a new emboss record is created.
Reissue Card Option
After a card is reissued, you will see a new emboss record for the card when expanding the card details
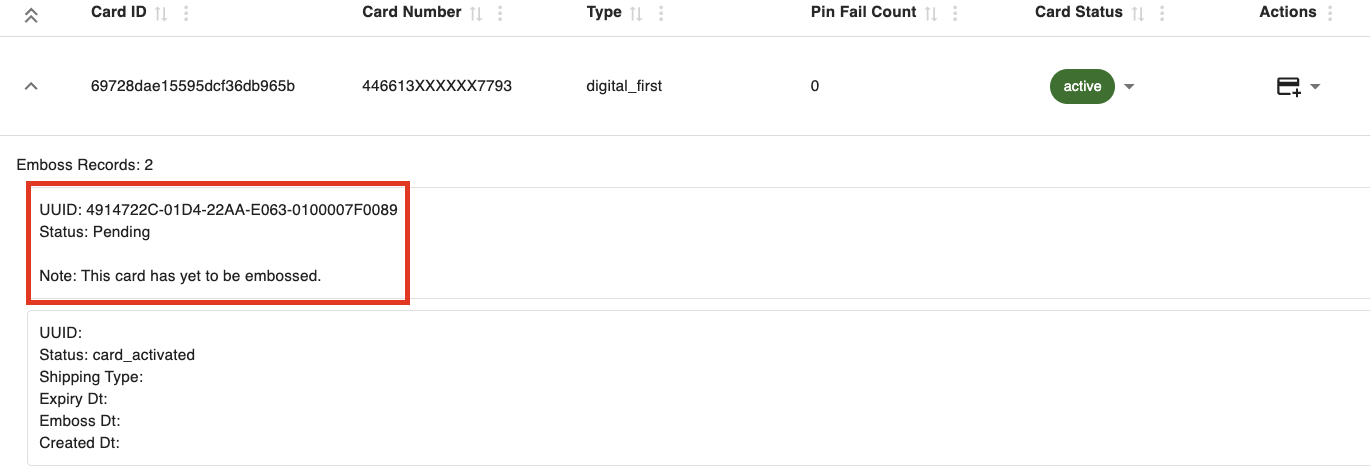
Emboss Record Example
For more information on reissuing cards, please see Replacing and Reissuing Cards.
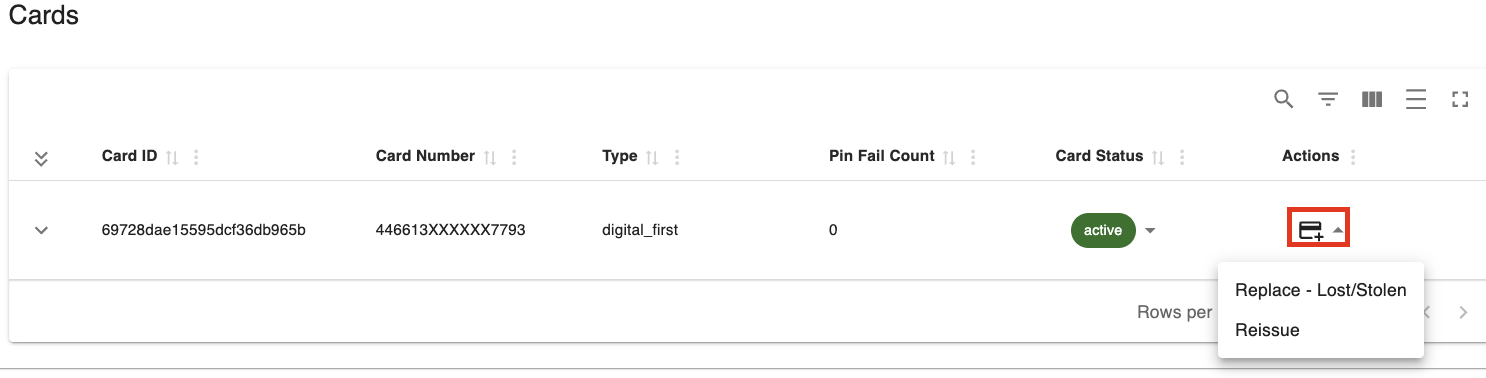
Replace Card
If a card is reported as lost or stolen, you can replace it via the 'card' icon in the 'Actions' column. Replacing a card means to generate a net-new card for an account with a new cardId. When replacing a card (see Replace Card), a new PAN, CVV, expiry, and emboss record are generated. The original card's status will be set to closed_ls once replaced.
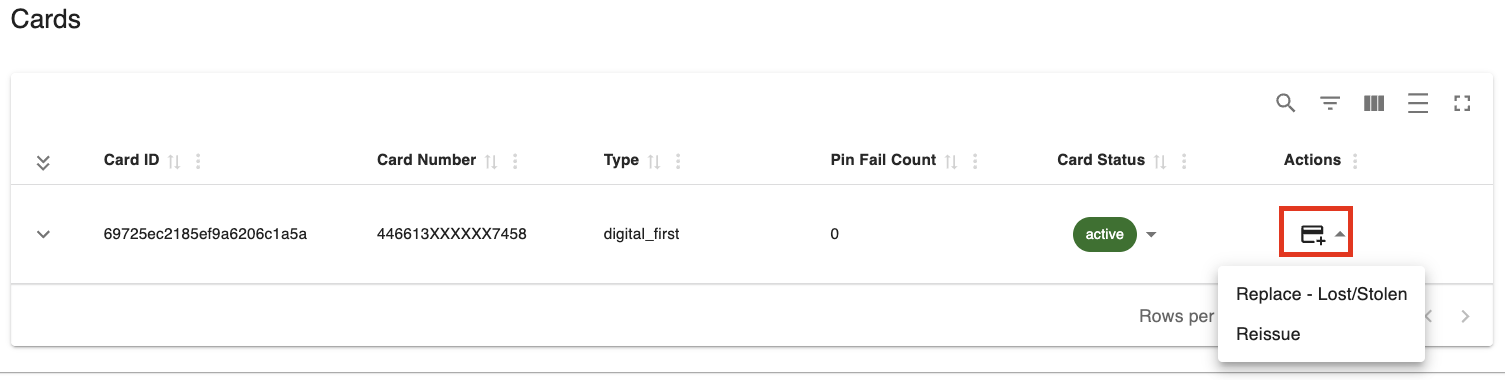
Replace Card Option
After the card is replaced, you will see a new card entry in the table and a new emboss record will be generated for the replacement card.
Replacement Card Example
For more information on replacing cards, please see Replacing and Reissuing Cards.
Reset Pin Fail Count
If a cardholder has exceeded their PIN attempts, you may reset their Pin Fail Count via a link that will appear in the 'Pin Fail Count' column.
View Transactions
The 'Transactions' tab contains a list of all transactions associated with the account. This list includes all card and non-card transactions. Please note that the 'Transactions' tab lists all authorization/transaction lifecycle events associated with purchases (initial auth, backout, settlement, etc.), which is useful for troubleshooting and seeing the progression of transactions. You can also filter/search for transactions by start and end date.
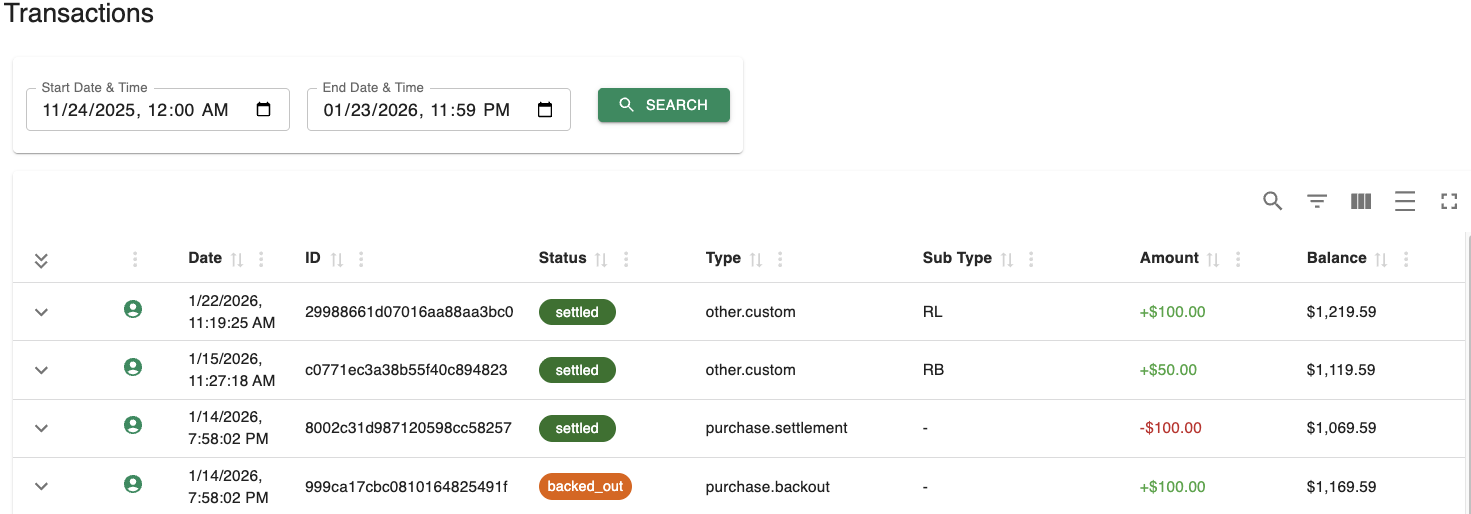
Transactions List
Each transaction row can be expanded to view more details. To view the raw transaction details from the underlying processor, click 'See Raw Details.'
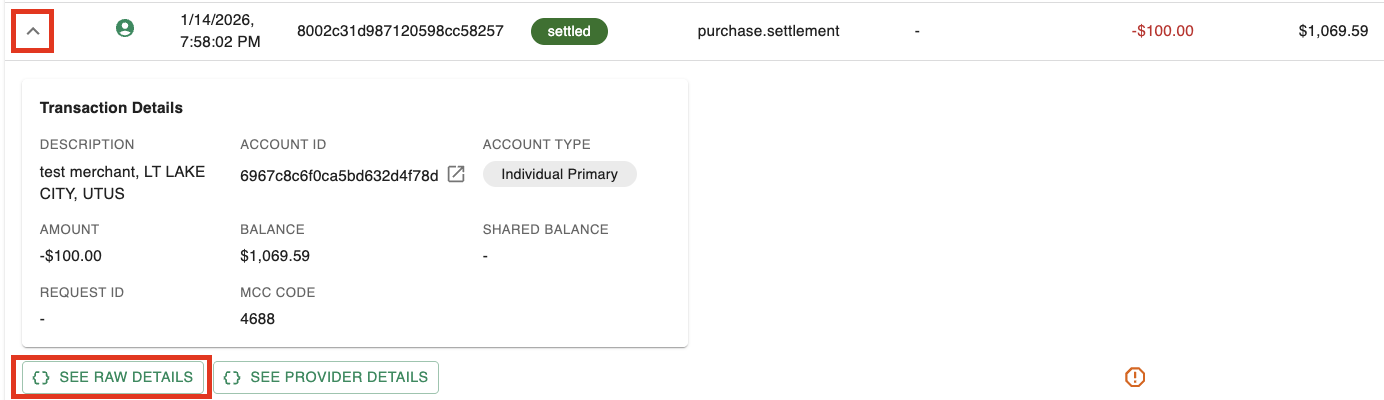
Transaction Details
For more information on transaction statuses and types/sub-types, please see Transaction Types & Status Values.
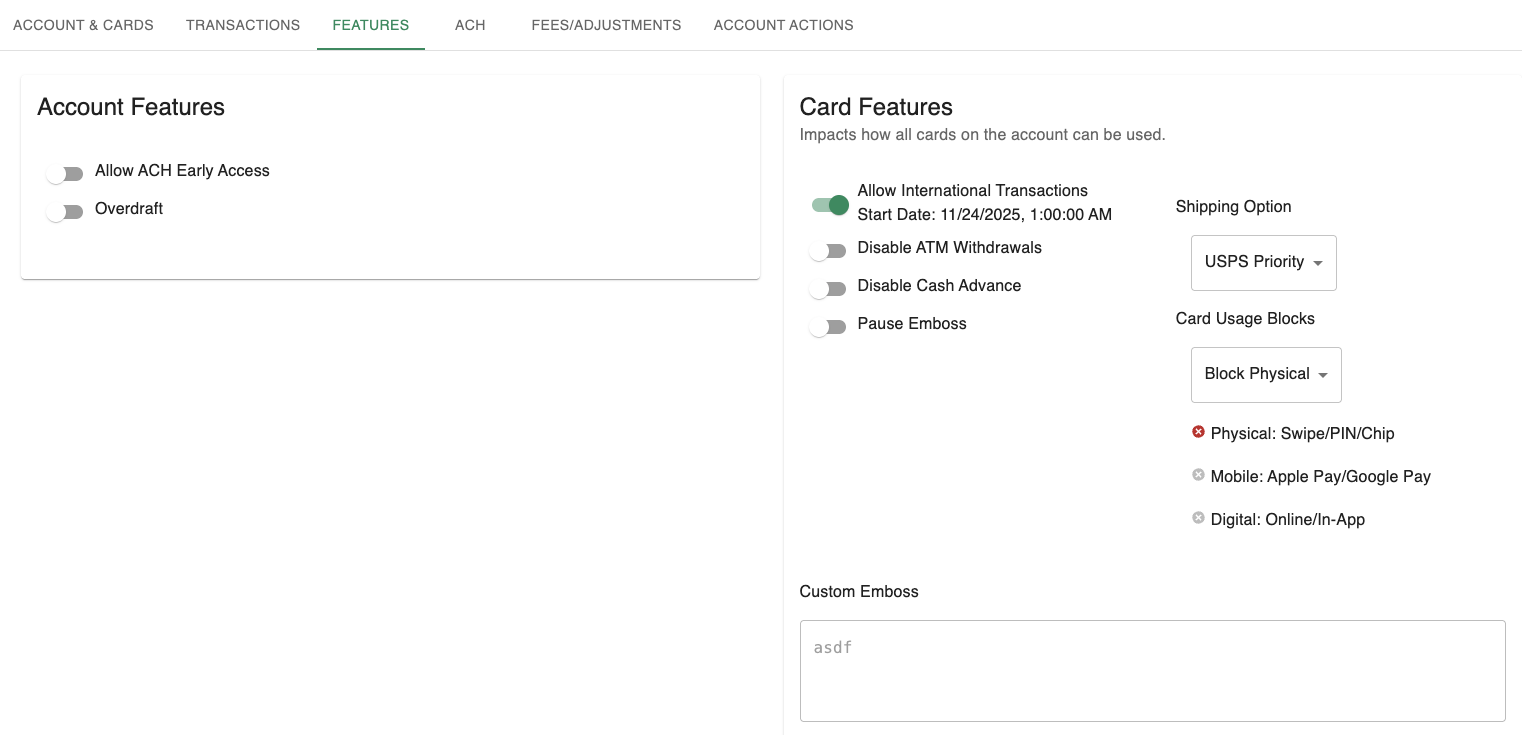
Update Account and Card Features
The 'Features' tab allows you to toggle account and card specific settings. The list of available options will be contingent on your program and product setup. All roles can view these features, but only the 'CS Manager' role can turn these features on and off.
Features Tab
Please Note
The 'Card Features' within this screen will affect all present and future cards associated with the account. For example, if you update the 'Shipping Option' to 'USPS Priority', it will affect the shipping for any cards reissued or replaced in the future. Likewise, disabling ATM withdrawals will affect all current and future cards unless toggled off.
You can also block certain types of transactions via this screen's 'Card Usage Blocks' section.
The 'Custom Emboss' section is a read-only field that displays extra emboss values that were passed to the embosser. The proper values and config will be configured with Spidr (if warranted) for your product.
View ACH Accounts and ACH Originations
The 'ACH' tab houses all 'ACH Accounts' associated with a customer, as well as all ACH originations (ACH pushes and pulls to other accounts). Incoming ACHs originated from external accounts can be found via the 'Transactions' tab. You can filter/search for ACH transactions by start and end date.
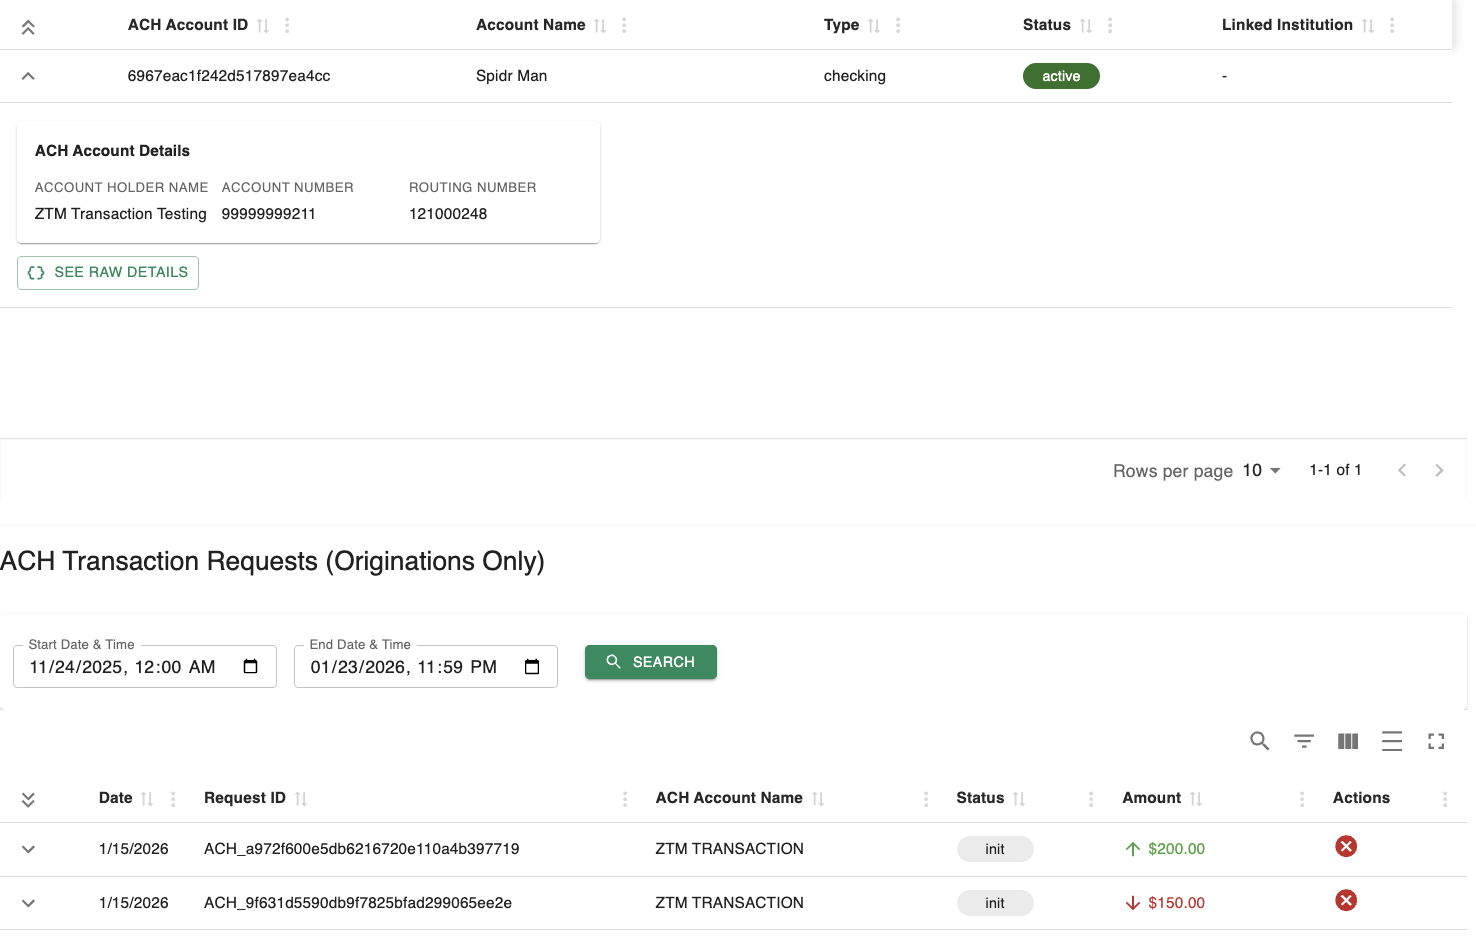
ACH Tab
Each row can be expanded to view more details about the ACH account or transaction. You can also click 'See Raw Details' to see the raw information from the underlying processor.
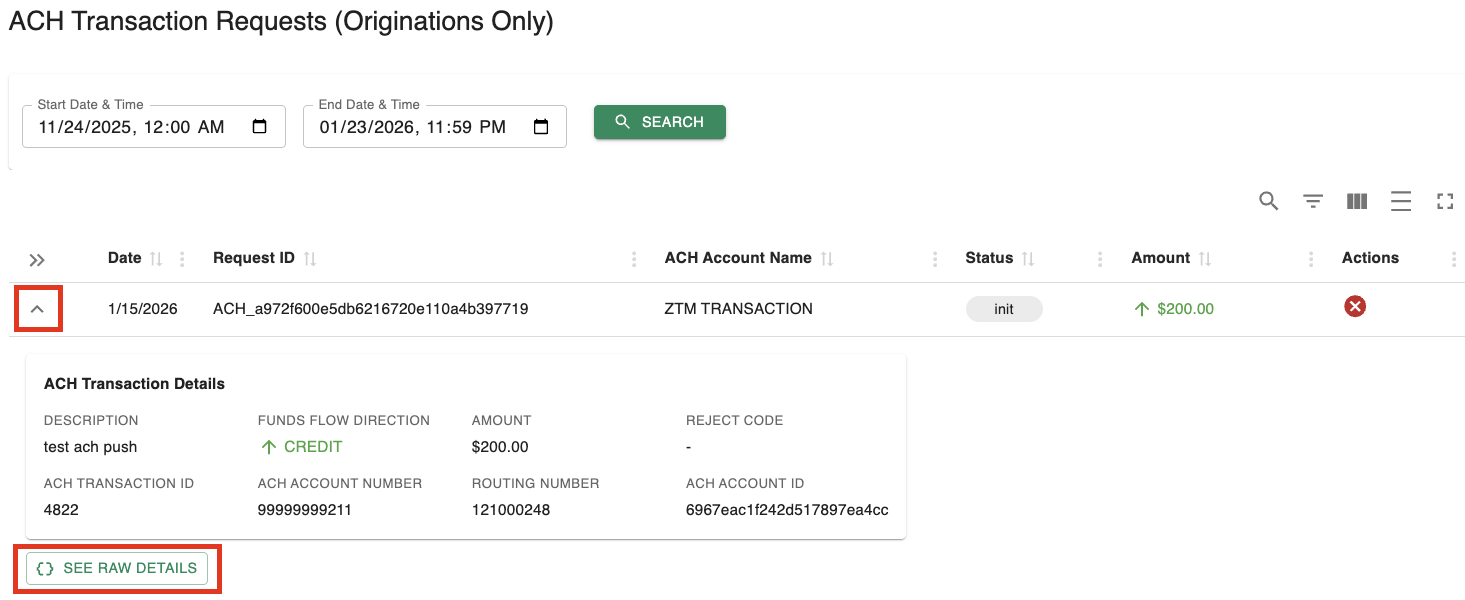
ACH Transaction Details
CS Manager and Compliance roles can cancel ACH originations if they are in the 'init' status. This removes the ACH from the processing queue so that it is not sent to external accounts. Please note that ACH originations cannot be canceled once they are no longer in this status. For a list of ACH statuses and their meanings, please see ACH Transaction Statuses.
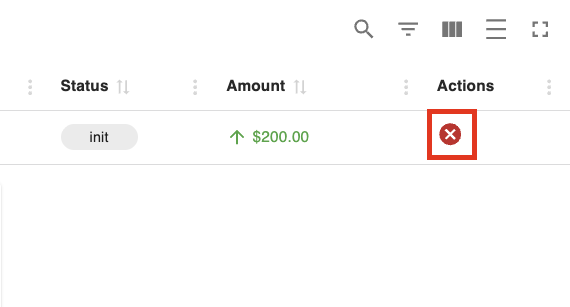
Cancelable ACH in 'init' Status
Create Fees and Adjustments
You can assess fees and create adjustments (debit or credit customer accounts) via the 'Fees/Adjustments' tab.
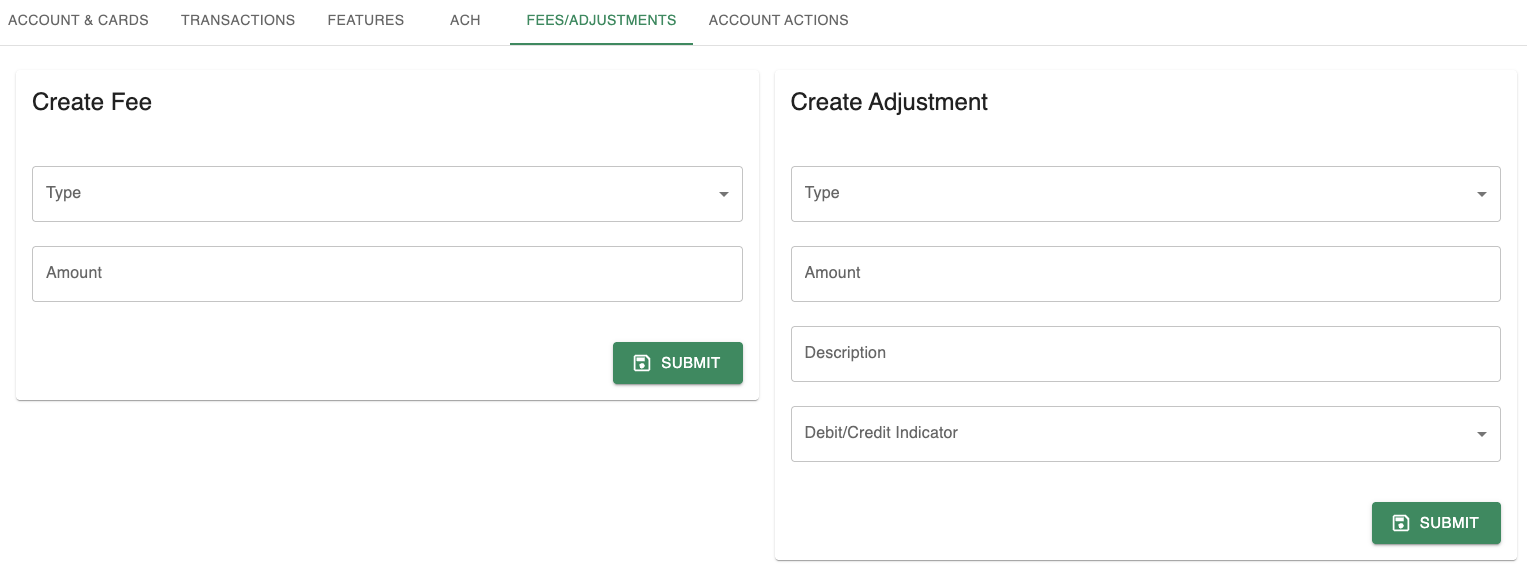
All roles (except read-only) can create adjustments. However, only the CS Manager role can create fees. The list of available fee and adjustment types will depend on your product configuration with Spidr.
Review Account Actions
The 'Account Actions' tab serves as an audit log of all activity related to the specified account. An action is recorded whenever your app or SST interacts with the account — whether it’s updating information, fetching data (like a card image), or performing any other request.
Unlike the 'User Actions' tab, only actions pertaining to the selected account are displayed in this tab.
Example Account Actions
For more information on viewing action details see Review Action Details
Review Action Details
SST actions provide a complete audit trail of all activity related to a user or account. Every interaction with the Spidr platform, whether initiated by your application or through SST, is logged as an action. This includes updates to user or account information, card operations, transaction creation, and more.
Each action entry includes details such as the action type, timestamp, status, and the source of the request (your app or SST). Clicking 'view details' on an action reveals detailed request, response, and risk (if configured for ZTM) data useful for troubleshooting or compliance reviews.
You can review actions from:
- The ZTM queues (Onboarding and Feedback). Only applicable if your program is enrolled in ZTM. For more information on ZTM, see ZTM Overview.
- The User Actions and Account Actions tabs on the User and Account detail screens.
Common Action Fields & Icons
All action rows entail the following fields/icons:
-
'Bypass ZTM' Icon - Indicates whether ZTM checks were ran on the action. ZTM checks may have been bypassed due to one of the following reasons:
- The 'bypass ZTM' parameter was passed in the API call
- The action was taken from within SST
- Your program isn't configured for ZTM
- The action type doesn't support ZTM checks

Bypass ZTM Icon -- the arrow icon indicates ZTM was bypassed
- 'Training Mode' Icon - Indicates whether training mode was enabled when the action occurred. Training mode is configurable per action as part of your product setup. When training mode is enabled, ZTM risk scores are returned but the action will not be blocked if it is high risk. This enables programs to fine tune their rule sets before enforcing them. Actions created while 'training mode' is enabled will always have a status of 'success' or 'failed', but never 'blocked.'

Training Mode Icon - The lightbulb icon indicates that 'training mode' was enabled when the action was created.
- Risk - Indicates the risk level of the action based on combined fraud and AML provider assessments, as evaluated by ZTM. Will only be displayed if ZTM checks were ran. Risk thresholds and rules can be configured with Spidr. Possible values are: low, medium, and high. Typically medium and high risk actions are auto-blocked, but this can be adjusted via your Spidr configuration.
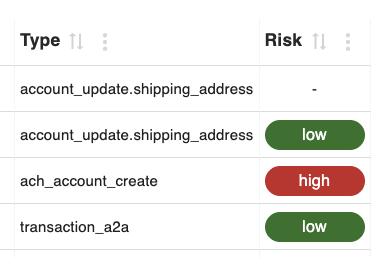
Risk Examples
- Status - Indicates whether the action made it through Spidr and to the underlying processor. Possible values are: success, failed, and blocked.
- Success means the action was processed successfully by Spidr and the underlying processor.
- Failed means there was an error processing the action. The error will be appended to the action details for review.
- Blocked means the action was prevented from reaching the underlying processor due to its risk level.
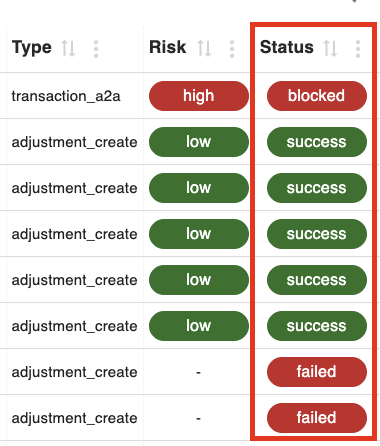
Status Examples
- Decision - Indicates the overall decision per the assessed riskiness of the action. Possible values are: approved and declined. 'Approved' actions are safe to process by Spidr and the underlying processor. 'Declined' actions are confirmed risky actions that should be blocked. Actions can either be auto-decisioned by ZTM or manually decisioned by SST users. This can be configured on a per action level.
Auto-decisioning
Depending on your product configuration, you may have auto-decisioning enabled for one or more actions. This allows you to specify a risk threshold and corresponding decision that ZTM will enforce. For example, you may configure it so that an 'edit user' action is automatically declined by ZTM if it is assessed as high risk.

Example Decisions
- ‘Feedback’ Icon – indicates whether you are able to leave feedback on an action. Feedback allows you to agree or disagree with ZTM auto-decisioning and helps train the ZTM model, as well as its underlying providers, to improve the accuracy of future risk assessments and decisions. Please note that only 'compliance' roles can leave feedback/see this icon.
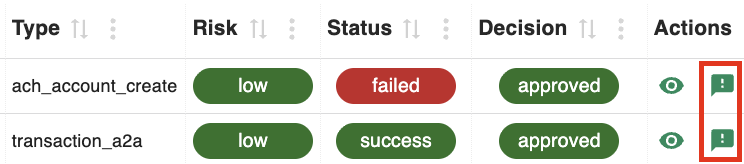
Example Feedback Icons
Action Details Modal
To review the details of an action:
- Locate the relevant row in the Spidr Actions table (via a ZTM queue, User Actions, or Account Actions).
- Click the Details / "View" button in the Actions column to open the Action Details modal (eye icon).

'Eye' Icon to View Action Details
Within the modal:
- The Summary section shows top-level fields such as Status, Overall Risk level, Decision, Feedback, Training Mode, and whether ZTM was bypassed. It also displays:
- Action Requestor - who or what initiated the underlying action. If the action was initiated by an SST user, the details of the SST user will be included.
- Provider Summary shows a breakdown of risk at the provider level (e.g., Sardine, Hawk, Plaid) including configuration IDs and workflow IDs.
- Decision Details and Feedback sections provide a full audit of who decided what, when, and why.
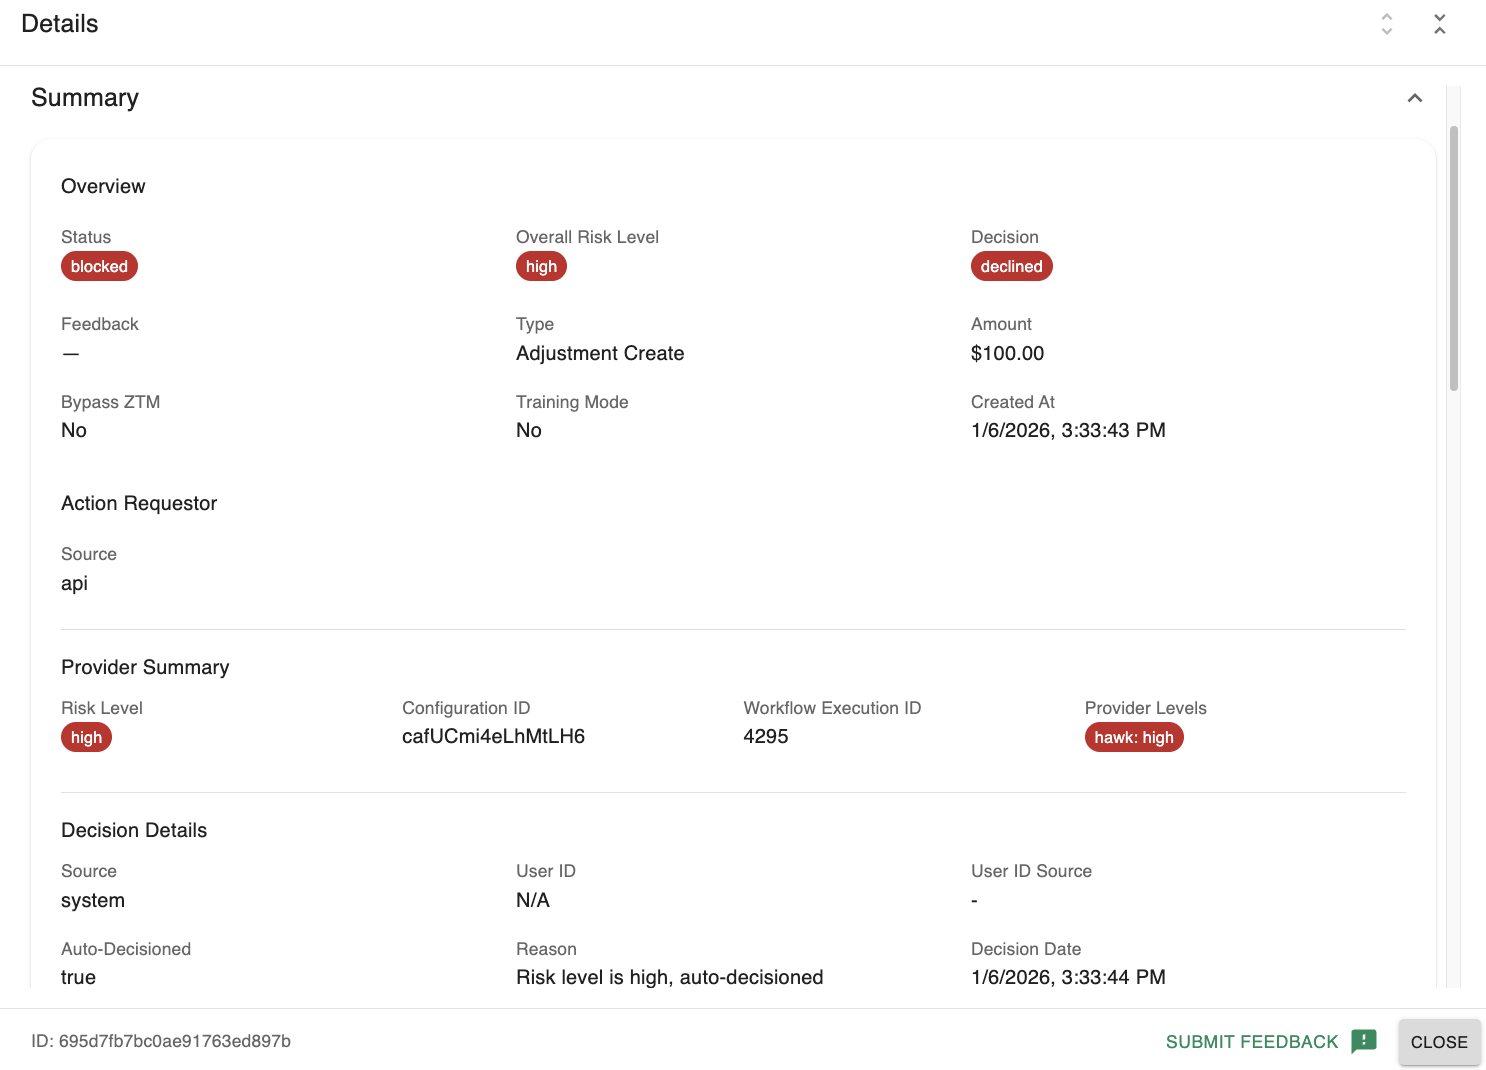
Example Summary Section
Use the 'expand all / collapse all' controls at the top of the modal to quickly open or close all subsections. You can also expand or collapse each section individually via these controls.

Example Expand/Collapse Icons for 'Action Details Modal' Sections
- The Change History section notes the before and after values for anything that was updated (if applicable).

Example Change History
- The Provider Details section includes raw information from the underlying risk providers (Sardine, Hawk, etc.) so that you can see how each provider scored the action. Within these sections is a link to 'jump out' to view the risk data from the corresponding vendor dashboard.
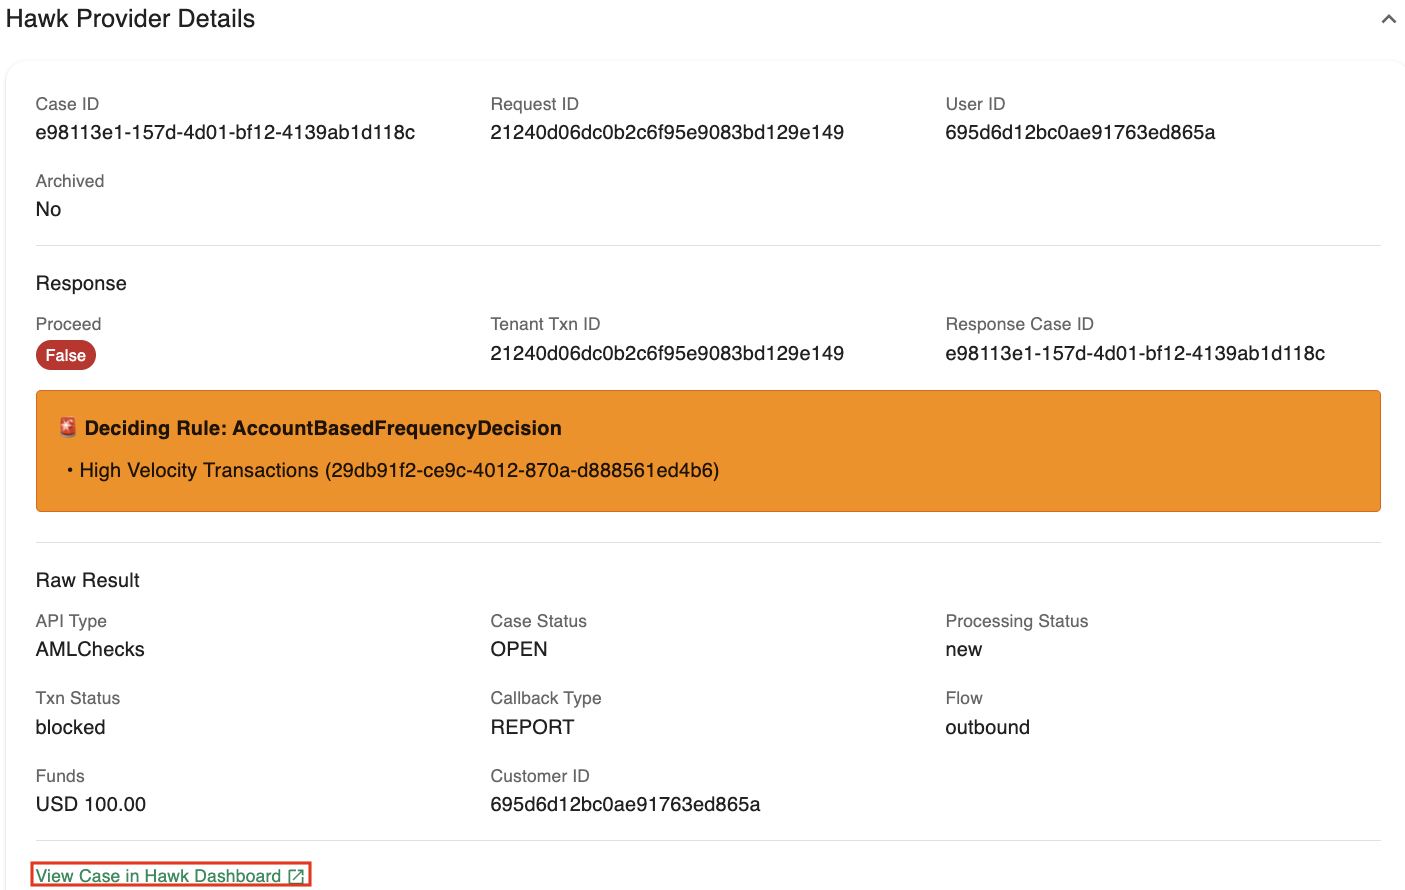
Provider Details with 'Jump Out' Link
- The Error section highlights any failures at the Unified or ZTM level for the action.

Example Error Within Action Details Modal
Notes Feature
SST provides a 'Notes' feature that allows SST users to leave comments on a customer. This is useful for documenting customer interactions, flagging special handling instructions, or leaving audit trails for other team members.
Accessing Notes
To access notes, look for 'notes' icon at the bottom right of the screen on all SST pages. Clicking this will open the 'Notes' window.
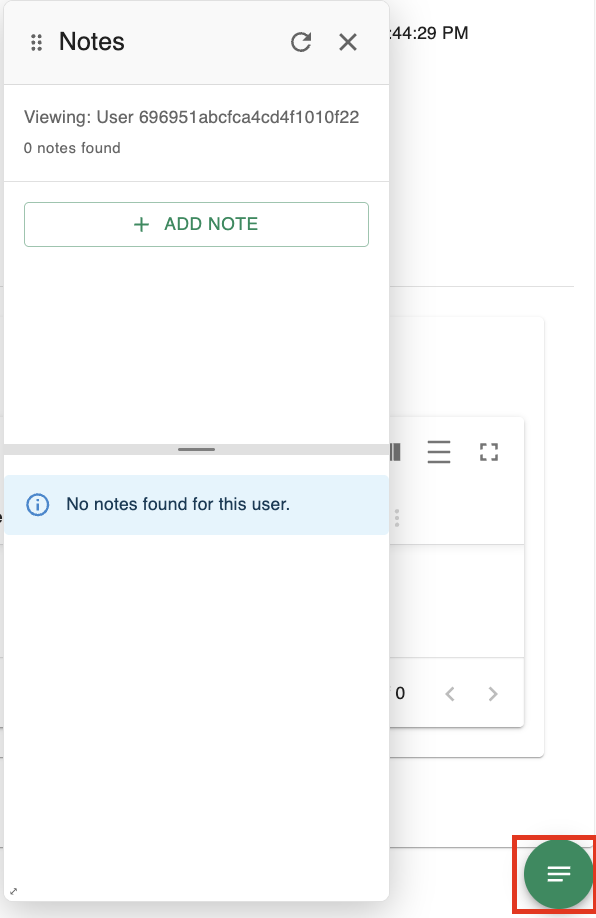
Notes icon and window
Using Notes
- View Notes: See a chronological list of notes left by other team members. Notes can be left at either the user-level or account-level.
- Create Note: Click "Add Note" to create a new entry.
- Account/User dropdown: You can attach a note to the general user profile or link it to a specific account.
- Category: Categorize the note (e.g., Account Maintenance, Fraud, Dispute) for better organization.
- After creating a note, it will be visible in the 'Notes' window for that account/user.
Notes are encrypted at rest to protect sensitive information.
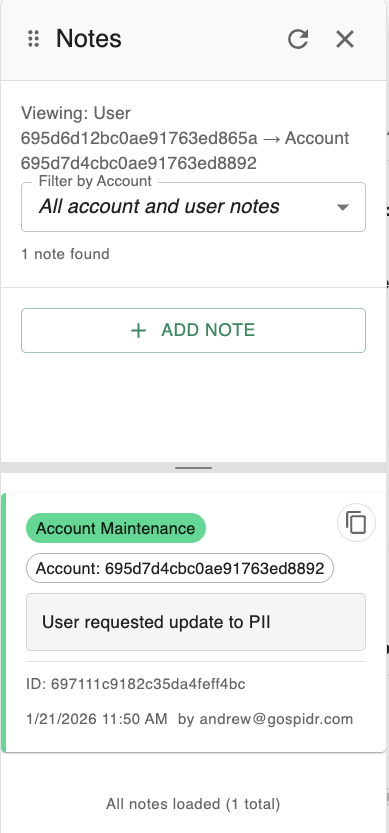
Example note
ZTM Overview
ZTM (Zero Touch Monitoring) is Spidr's integrated risk and decisioning engine. ZTM helps monitor user and account activity to detect fraud, AML risks, and suspicious behavior. ZTM seamlessly integrates with Unified to simplify operations and risk decisioning, see here for more details.
When ZTM scores an activity, such as an onboarding attempt or a transaction, it attaches it to a Spidr Action. These actions are routed to specific queues in SST for manual review by your Fraud & Compliance team. See here for more information on actions.
ZTM Queues
For clients integrating with ZTM, the sidebar provides access to specialized queues for reviewing ZTM-scored actions.
Please Note
ZTM is modular and supports many different use cases. You may see one (or none) of the queues mentioned below depending on your configuration with Spidr.
Example ZTM Queues
IDV & Monitoring Queue
The IDV & Monitoring Queue collates all 'user_create' and 'watchlist' actions for companies enrolled in IDV and/or watchlist monitoring through ZTM.
This queue is used to manually review and decision onboarding attempts and/or any watchlist hits found across a program.
For more information on navigating actions and the various icons displayed in the table, reference 'Review Action Details.' For guidance on decisioning IDV actions and watchlist hits, see IDV Manual Review and Decisioning.
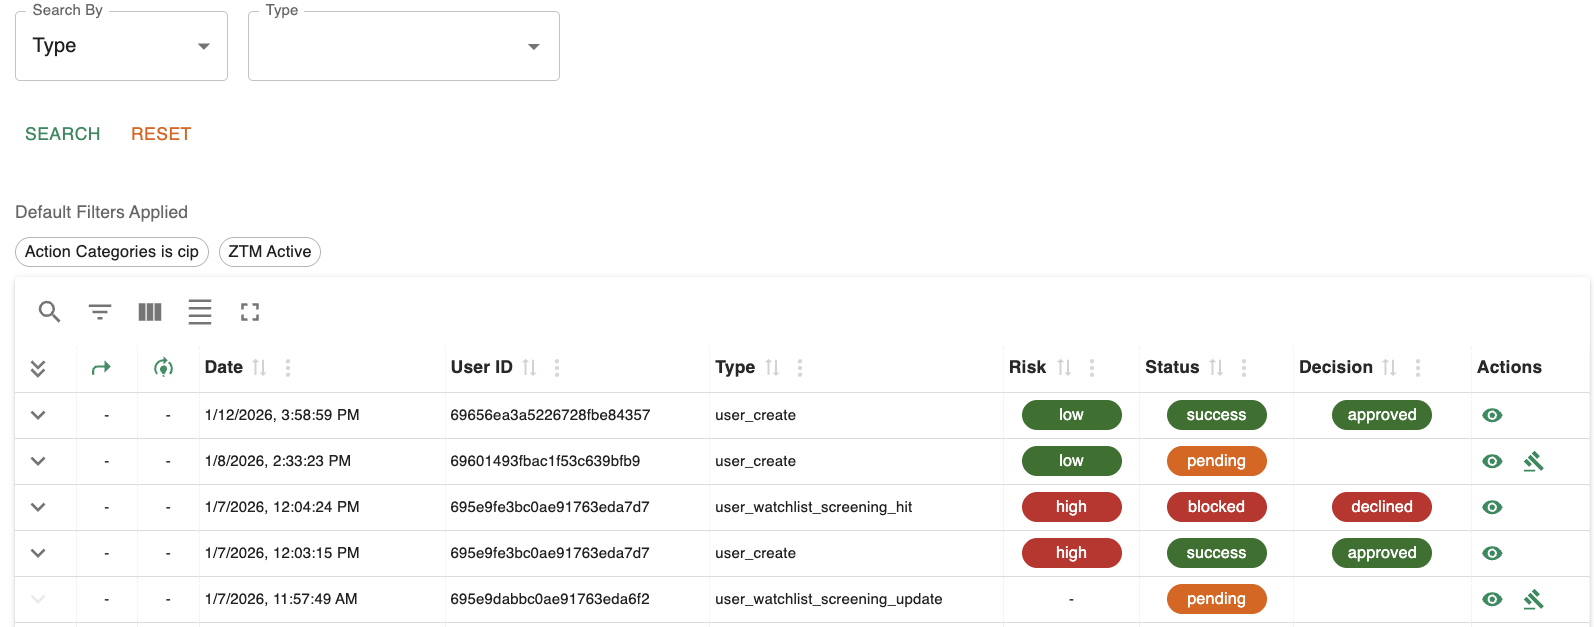
Example IDV & Monitoring Queue
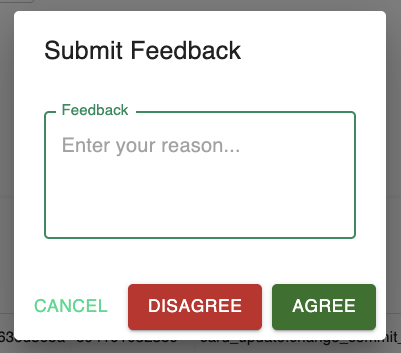
Feedback Queue
The ZTM Feedback Queue collates all actions that were 'auto-decisioned.' Feedback allows you to agree or disagree with ZTM auto-decisioning and helps train the ZTM model, as well as its underlying providers, to improve the accuracy of future risk assessments and decisions. Please note that only 'compliance' roles can leave feedback and see the feedback icon.
Submit Feedback (Agree / Disagree)
- The 'Feedback' icon appears when an action already has a decision but no feedback.
- You can either:
- Click the feedback icon in the Actions column of the table for a single row, or
- Use Submit Bulk Feedback to apply feedback to multiple selected actions at once.
- In the feedback dialog:
- Enter a comment in the Feedback field (for example, why you agree or disagree with the decision).
- Click Agree if you believe the system’s decision was correct, or Disagree if it was incorrect.
- The feedback is sent to ZTM to improve model performance and recorded in the action’s Feedback section. The feedback is also attached to the action and viewable via the 'Action Details' modal for later reference.

Example Feedback Icon
Example Feedback Modal
IDV Manual Review and Decisioning
IDV Action Details
When an onboarding flow requires identity verification, ZTM attaches all provider (Plaid, Sardine, etc.) and risk information to the 'user_create' action.
Example user_create Action that Entails IDV
The status and risk of the 'user_create' action will remain 'pending' until the following conditions are met:
- The customer has completed the onboarding flow and provided all necessary information.
- The action has been manually reviewed (if configured for manual review).
- The action has been decisioned after any applicable manual review.
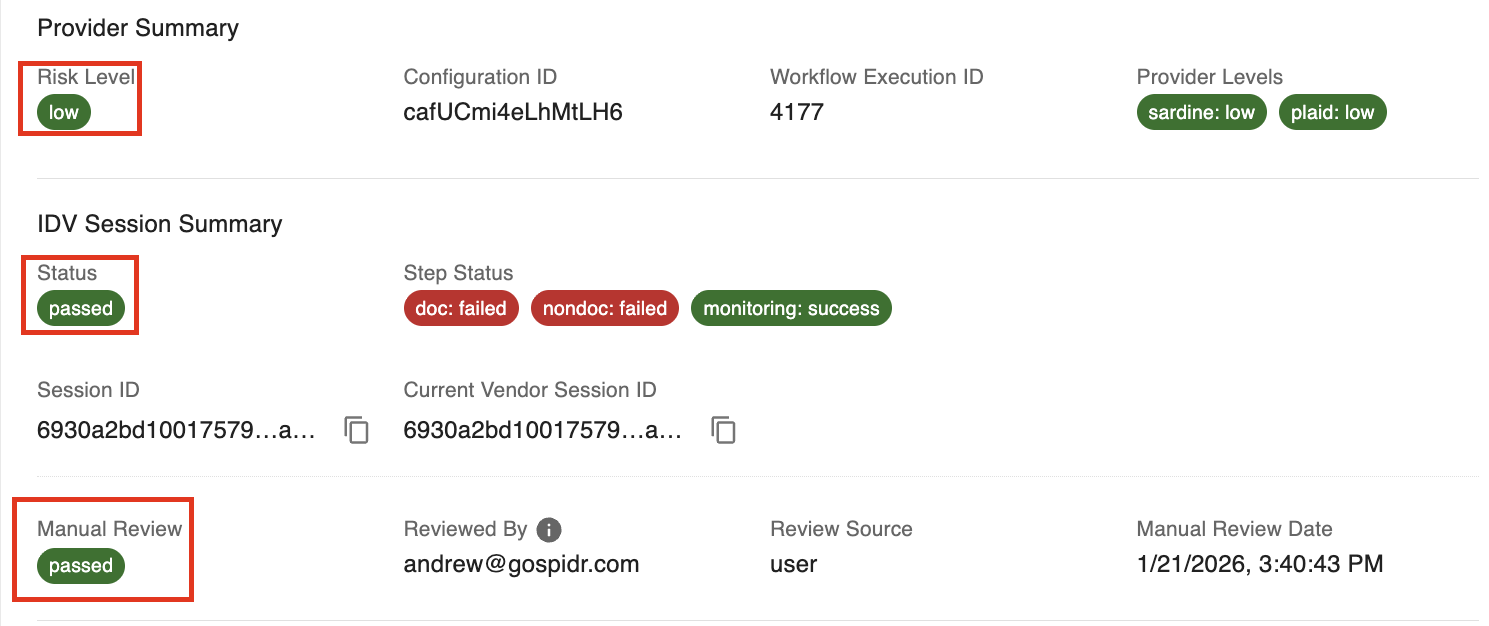
The 'user_create' action contains much of the same information already covered in Review Action Details. However, user_create actions with an IDV component will also contain an 'IDV Session Summary' section, along with an IDV vendor specific section, see below.
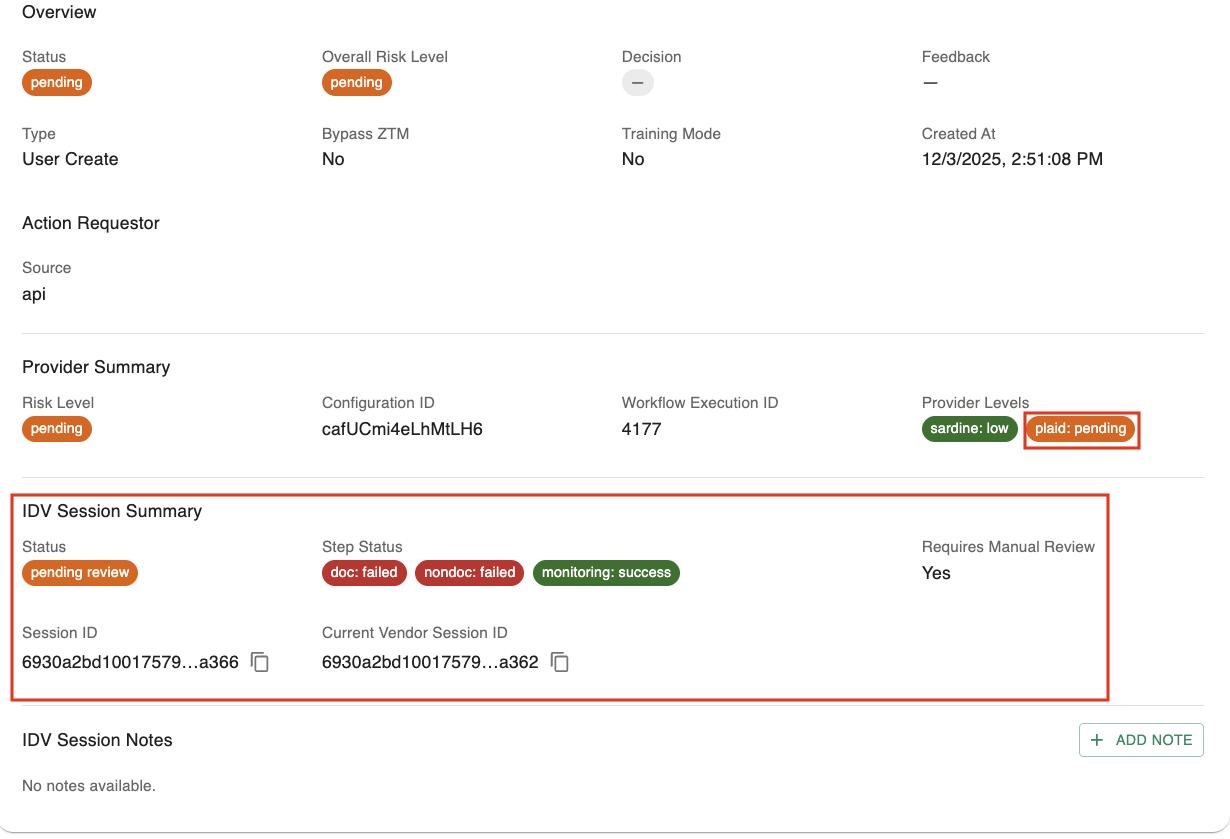
IDV Session Summary Example
The 'IDV Session Summary' section gives an overview of the IDV session progress. It displays the following fields:
- Status - The IDV session status. If the session requires manual review, a 'pass' or 'fail' status will be assigned by the SST user reviewing this action. If manual review is not required, the session status will be set by the underlying IDV provider. This pass or fail status informs the overall risk level assigned to the IDV provider. For example, a 'pass' would update the 'Provider Level' of Plaid from 'pending' to 'low' risk in the screenshot above.
- Step Status - Tracks each step of the provider flow as either success, failed, or in progress.
- Requires Manual Review - Whether the action requires manual review per your configuration with Spidr. Manual review requires an SST user to decide if a given IDV session is a pass or fail.
- Session ID & Current Vendor Session ID - IDs for the given session within Spidr and at the provider level.
- IDV Session Notes - Allows you to leave encrypted notes associated with the IDV session for later reference and correspondence with other SST users.
The screenshot below covers the IDV provider section within the 'Action Details' modal. This section summarizes information from the provider being used for IDV.
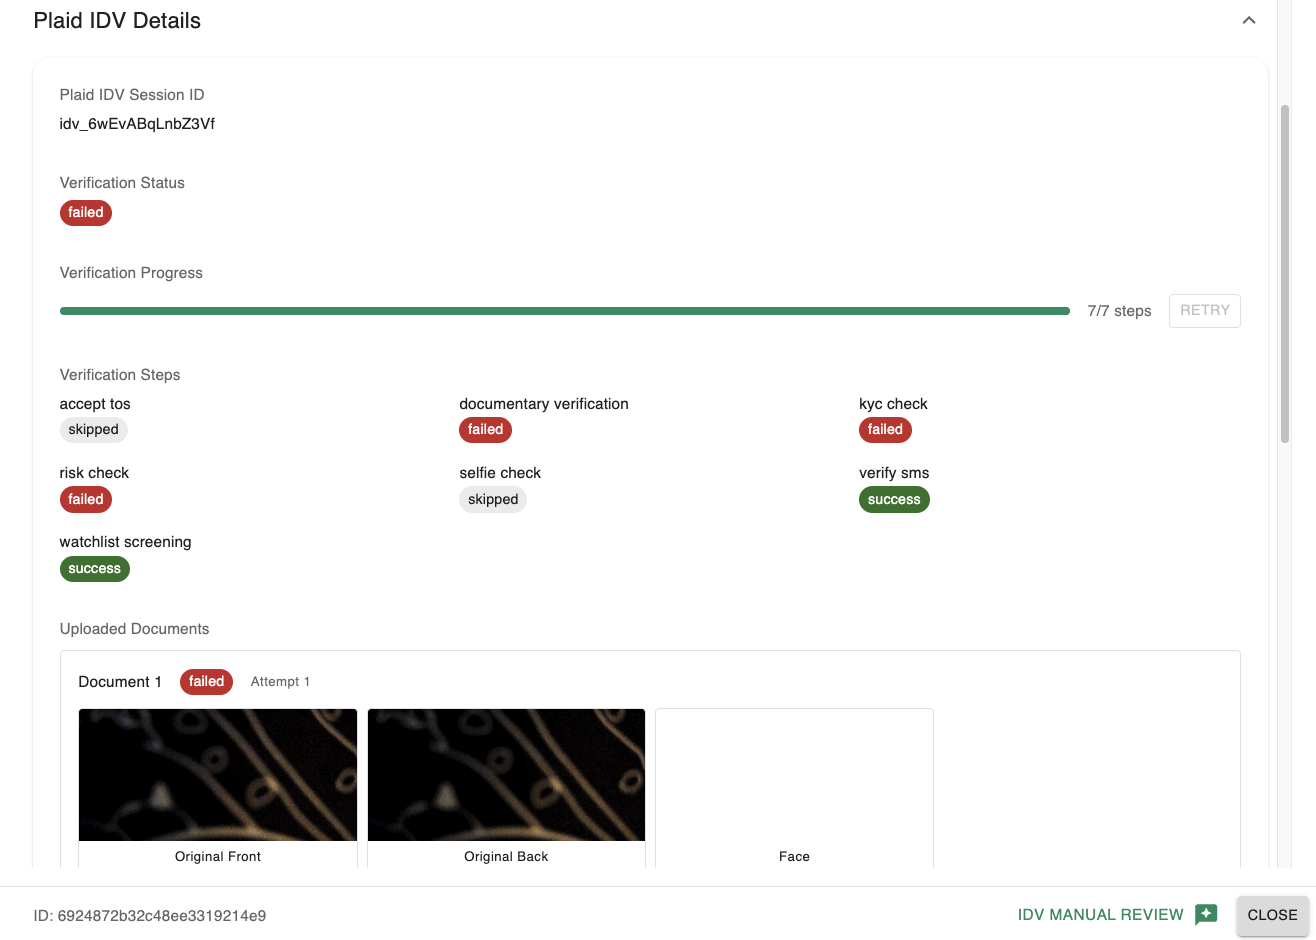
Example user_create Action with IDV Details
The 'Plaid IDV Details' section displays the overall progress of the onboarding flow as well as the step status to gauge the customer's onboarding state. The session can be retried via the 'Retry' button if it's incomplete or if the 'IDV Session Status' is still 'pending review.'
This section also allows you to securely view any documents that the customer uploaded during onboarding.
IDV Manual Review
Manual review is a setting that requires all IDV sessions to be reviewed by an SST compliance user, allowing a pass or fail decision to be made independently of the underlying provider’s verification result. Manual review preserves the verification status of the underlying provider while still allowing the program to independently mark a session as high or low risk as needed.
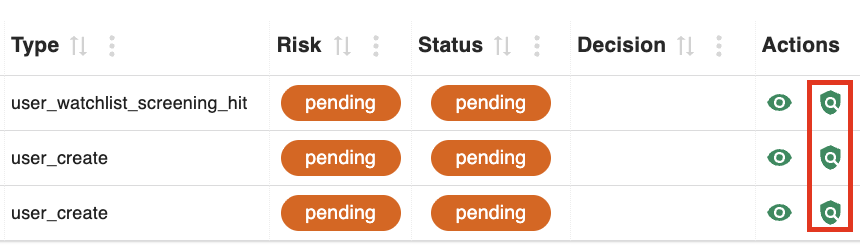
Once a customer has completed the onboarding flow with a provider, a 'manual review' icon will appear in the 'Actions' column. Manual review can also be triggered from the 'IDV Manual Review' button in the 'action details' modal.
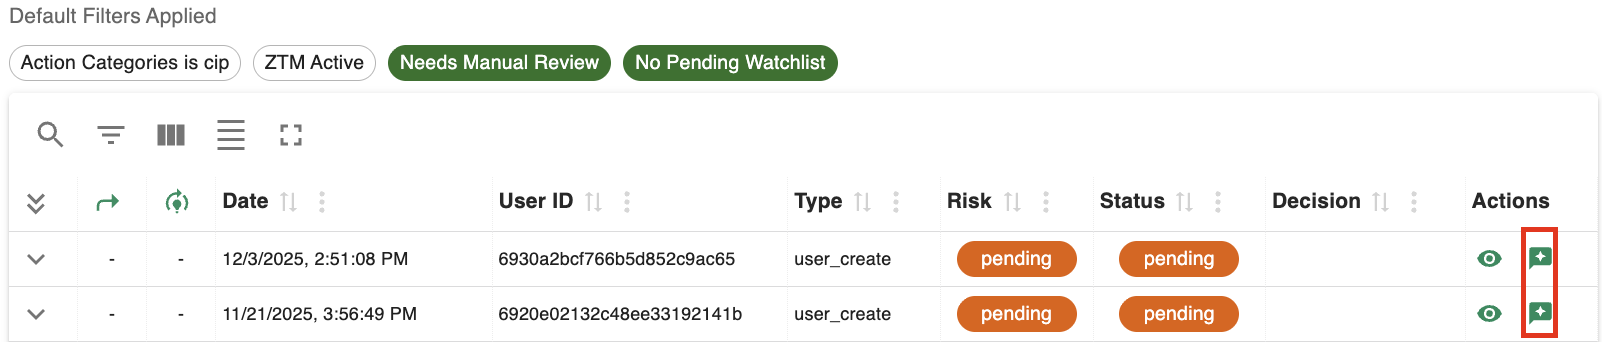
Example Manual Review Icon
Notice how the 'Risk' for the user_create action is 'pending' since it still needs to be manually reviewed. Clicking the 'Manual Review' icon or button opens an 'IDV Manual Review' modal where you:
- Choose whether to pass or fail the IDV session.
- Submit the result. ZTM updates the IDV session, and the action proceeds to the final 'decision' phase.
- In some cases, if a watchlist screening is still Pending Review, the IDV manual review button will be disabled until the watchlist review is complete.
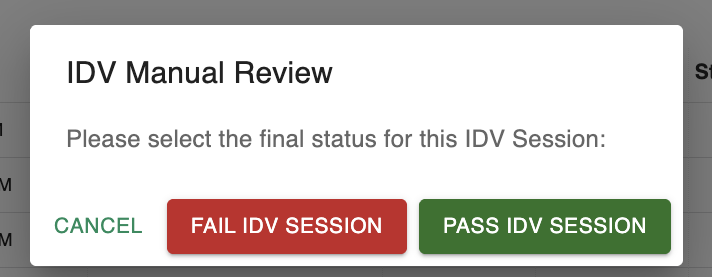
IDV Manual Review Modal
If the IDV session is passed and all other provider risk levels (Sardine, etc.) are low, then the overall risk level for the 'user_create' action will be set to 'low.'
However, if the IDV session is failed and/or other provider risk levels are high, then the overall risk level for the 'user_create' action will be set to 'high.'
Example Manual Review 'Pass'
Per the screenshot above, since the action passed manual review, the IDV session status was set to 'passed' and the risk level was set to 'low.'
Once a 'user_create' action has been manually reviewed, it will move on to the 'decision' phase, see below.
IDV Decisioning
Decisioning is the final step in reviewing a 'user_create' action. Decisions can only be applied to actions with a finalized risk level. Since the below action has a risk level of 'low' per manual review, it is ready to be decisioned.

Example Decision Icon
Decisioning can be carried out via the 'decision' icon in the 'actions' table or via the 'Make Decision' button in the 'Action Details' modal.
After clicking the icon or button, you will be presented with the 'Decision' modal:
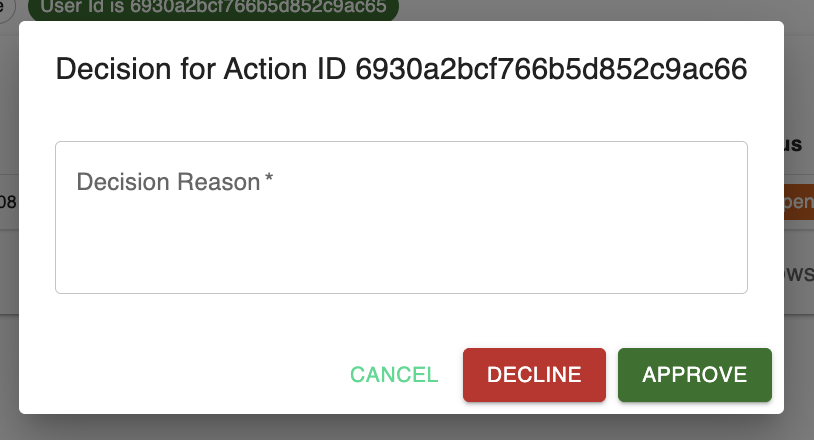
Example Decision Modal
You must 'Decline' or 'Approve' the action and provide a reason before proceeding.
Approving the action does the following:
- Updates the action status to 'Success'
- Records the decision to the action for later reference
- Updates the 'CIP Status' of the corresponding user to 'Pass'
Declining the action does the following:
- Updates the action status to 'Blocked'
- Records the decision to the action for later reference
- Updates the 'CIP Status' of the corresponding user to 'Fail'
Users with a 'CIP Status' of 'fail' are prevented from creating an account.
Watchlist Review
Example watchlist actions
- If your IDV program entails watchlist screening, ZTM will automatically initiate watchlist/sanctions screening as part of CIP.
- If a screening returns a hit that needs review, the watchlist status will show as
pending_reviewand a ZTM action will appear in the IDV & Monitoring tab and on the 'CIP' tab for the user. Please note that if the watchlist hit occurred while there is a 'pending' user_create action, it will be attached to the user_create action. - Completing a watchlist review (for example, confirming a true match vs. a false positive) updates the watchlist status. All hits must be confirmed or dismissed before the 'Watchlist Status' is updated.
Example Watchlist Icons
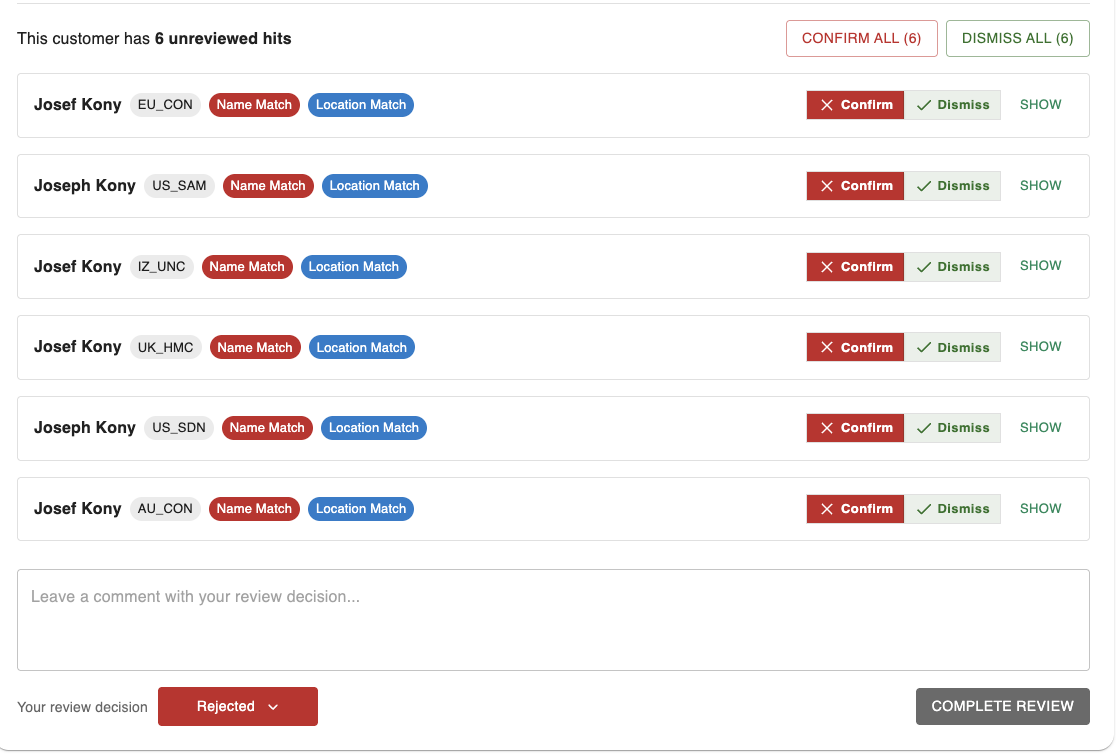
Example Watchlist Review
SST Roles
SST features four distinct roles to ensure segregation of duties and limit unnecessary access to customer data. See below:
| Role Name | Description | Access Overview |
|---|---|---|
| CS Agent | Customer Service Agent
|
|
| Read-Only Agent | Read-only version of the CS Agent role
|
|
| CS Manager | Customer Service Manager
|
|
| Fraud & Compliance | Elevated privileges for accessing and updating customer info for fraud triage/remediation |
|
SST Role Capabilities
The following table summarizes the available actions per role within SST.
User & Accounts
| Functionality | Agent Access? | CS Manager Access? | Compliance Access? |
|---|---|---|---|
| Search for users & accounts | Yes | Yes | Yes |
Validate or View ID Number (SSN, ITIN, etc.) Validation happens by entering a partial number provided by the user. The system will compare the partial value to what's stored. This allows you to confirm that a user is authentic without revealing the full ID Number. | Validate ID Number | Validate ID Number | View ID Number |
View ID Number History Allows you to see if the user's ID Number has changed. If it has, you will see who changed the ID along with the date/time it was changed. | No | No | Yes |
| Edit ID Number | No | No | Yes |
| View User & Account Info | Yes | Yes | Yes |
| Edit User Info | Able to edit everything except first, middle, and last name, and date of birth. | Able to edit everything except date of birth. | Able to edit all info (including date of birth) |
| Update User Status | Able to choose either
| Able to choose either
| Able to choose from:
|
| Update Account Status | Able to either
| Able to either
| Able to choose from:
|
| Update Shipping Address | Can only update after account is more than 30 days old. | Can update at any time. | Can update at any time. |
Cards
| Functionality | Agent Access? | CS Manager Access? | Compliance Access? |
|---|---|---|---|
| View Cards | Yes | Yes | Yes |
| See card emboss data | Yes | Yes | Yes |
| Replace card (lost/stolen) | Yes | Yes | Yes |
| Reissue card (damaged) | Yes | Yes | Yes |
| Freeze/unfreeze card | Yes | Yes | Yes |
| Reset PIN fail count | Yes | Yes | Yes |
| Update card blocks | No | Yes | No |
Transactions
| Functionality | Agent Access? | CS Manager Access? | Compliance Access? |
|---|---|---|---|
| View transactions (top-level) | Yes | Yes | Yes |
| View transactions (detailed view) | Yes | Yes | Yes |
Account / Card Features
| Functionality | Agent Access? | CS Manager Access? | Compliance Access? |
|---|---|---|---|
| View Account Features | Yes | Yes | Yes |
| View Card Features | Yes | Yes | Yes |
| View Card Usage Blocks | Yes | Yes | Yes |
| Edit Account Features | No | Yes | No |
| Edit Card Features | No | Yes | No |
| Edit Card Usage Blocks | No | Yes | No |
ACH
| Functionality | Agent Access? | CS Manager Access? | Compliance Access? |
|---|---|---|---|
| View ACH Account data | Yes, however the ACH Account Number is masked | Yes, full ACH Account Number is visible | Yes, full ACH Account Number is visible |
| View ACH Transaction Requests | Yes, however the ACH Account Number is masked | Yes, full ACH Account Number is visible | Yes, full ACH Account Number is visible |
| Cancel ACH Origination | No | Yes | Yes |
| View Linked Institutions | Yes | Yes | Yes |
| Remove Linked Institutions | Yes | Yes | Yes |
Fee & Adjustments
| Functionality | Agent Access? | CS Manager Access? | Compliance Access? |
|---|---|---|---|
| Create Fee | No | Yes | No |
| Create Adjustment | Yes | Yes | Yes |
ZTM & Actions
| Functionality | Agent Access? | CS Manager Access? | Compliance Access? |
|---|---|---|---|
| View ZTM Feedback Queue | Yes | Yes | Yes |
| View 'User Actions' and 'Account Actions' tabs | Yes | Yes | Yes |
| 'User Actions' and 'Account Actions' detailed view | Yes | Yes | Yes |
| Submit ZTM Feedback | No | No | Yes |
| Submit ZTM Decisions | No | No | Yes |
Updated 6 months ago